
The Airbrush tool, with the proper 'Tip' can be used to mimic a real airbrush which excels at creating soft even strokes. Users can select the tool from the 'Paint' interface tab under the 'Paint Tools' subtab of the toolbox. The 'Airbrush' tool can also be activated from the menu bar option under the "Texture > Paint Tools" menu. When selected, the tool will also auto-select a Tip allowing users to begin painting directly into the active image map, defined by the image in the shader tree with the small paintbrush icon next to it (![]() ). Simply select a different target layer if you wish to paint onto a different layer. Users may also select different Tips and additionally add Ink and Nozzle effects to the airbrush to further customize the way the brush applies to the surface. When selected, the associated attributes display in the associated Properties panel.
). Simply select a different target layer if you wish to paint onto a different layer. Users may also select different Tips and additionally add Ink and Nozzle effects to the airbrush to further customize the way the brush applies to the surface. When selected, the associated attributes display in the associated Properties panel.
Airbrush--
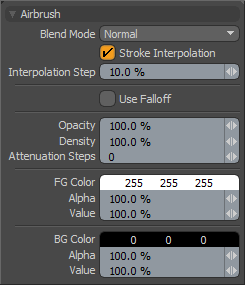 Blend Mode: The Blend Mode defines how the strokes will blend into the existing canvas. The default 'Normal' setting will apply opaque strokes (as defined by the 'Opacity' option) over the top of the existing canvas. The alternate options will work in the same respect as the layer blending options documented with examples on the Blend Modes page of the documentation.
Stroke Interpolation: When the option 'Interpolation' is enabled, modo will add additional sample points and filter out small variances in pressure and position resulting in smoother strokes.
Interpolation Step: Generally, paint strokes are not a continuous lines, but a series of dots or dabs placed on the canvas. This option defines the distance between each dab as a percentage of the brush size. By default, this value is set to 10%. So for an 80 pixel sized brush, dabs would be placed every 8 pixels (10% of 80 = 8). Users can increase or reduce this value for a variety of effects. Increasing it toward 100% will produce individual dots, rather than what looks like a stroked line.
Use Falloff: The 'Use Falloff' option will allow any of the various falloffs to mask the application of brush strokes. Since the RMB brush sizing function supersedes the RMB function to define the falloff, ensure the falloff is defined prior to activating the tool.
Opacity: This value determines how the total opacity of the ink distributed by the brush. If the value is less than 100% the ink will max out at that percentage and never become fully opaque no matter how many times you paint over the stroke.
Density: This value determines the amount of ink that comes out during a paint stroke. Unlike Opacity, when Density is below 100% painting over the existing stroke repeatedly will continue to increase the amount of paint on the map.
Attenuation Steps: This value will cause the paint to "fade out" after the set number of steps is reached in the stroke. This setting is somewhat related to the speed with which you create the stroke as painting quickly will spread out the "steps" used to paint the stroke. Moving the brush slowly with this value set above 0 will cause the paint to run out in a shorter stroke. This is a very useful setting to use if you do not have a tablet to paint with. Tablet users would be better suited to modulate the paint opacity based on the tablet pressure so as to have greater control.
FG Color: Sets the foreground color for various paint tools. This can be set via the color component on the tool properties or by clicking on the Color Picker while the tool is active.
Alpha: This option allows an alpha value to be associated with the FG paint color.
Value: This percentage can be used to increase or decrease the overall value of the ink being applied. This value can be set over 100% enabling high dynamic range paint strokes (if your image was created with the floating point (FP) mode active or loaded as a file that supports HDRI).
BG Color: Sets the background color for paint tools that use it. This can be set via the color component on the tool properties or by clicking on the Color Picker while the tool is active.
Alpha: This option allows an alpha value to be associated with the BG paint color.
Value: This percentage can be used to increase or decrease the overall value of the ink being applied. This value can be set over 100% enabling high dynamic range paint strokes (if your image was created with the floating point (FP) mode active or loaded as a file that supports HDRI).

