
A Bezier Curve is a type of curve defined by control vertices. Each vertex is controlled by two other points that control the endpoint tangent vectors. The Bezier handles are then used to adjust the curvature of the path. Geometry or items may be cloned along this path defined by the settings of the clone effector. Each cloned item will be duplicated as a straight mesh, increasing the polygon count within the scene file. modo also offers users options to clone items as 'Instances' or as 'Replicator' items which do not increase scene geometry. The Bezier Clone tool is available in the menu bar under "Geometry > Duplicate > Bezier Clone". Users may also select the tool directly in the 'Duplicate' subtab of the modeling toolbox found in the 'Model' and 'Model Quad' interface tabs. Users can LMB+click and hold the toolbox button to open a fly out menu providing the alternate tool options.
To use, simply activate the tool by LMB+clicking the tools icon, once active the following properties will appear in the tool properties panel of the default interface. Users can then LMB+click in the 3D viewport to create curve Points at the intersection of the mouse click in the viewport and the Work Plane. The curved path will be created between each path point as subsequent points are added. Bezier Curves support three modes: 'Add', 'Edit' and 'Delete'. You can use these modes to create additional points, edit them, or remove them from the curve, during the drawing operation. Users can interactively edit the curves as well, by selecting a particular point in the path by hovering the mouse over the point and LMB+clicking to change it to yellow selecting it, users can then LMB+click and drag the selected element to modify its position, this also works for editing the bezier handles. Users can also add points between existing positions by selecting a point and then LMB+clicking away from the selected point adding the intermediate point. Points on the Bezier Curve can be positioned precisely by using the Point XYZ fields of the tools properties form. Once the tool is dropped by pressing the 'Q' key, the cloned items will be in effect set and no further editing of the path is possible.
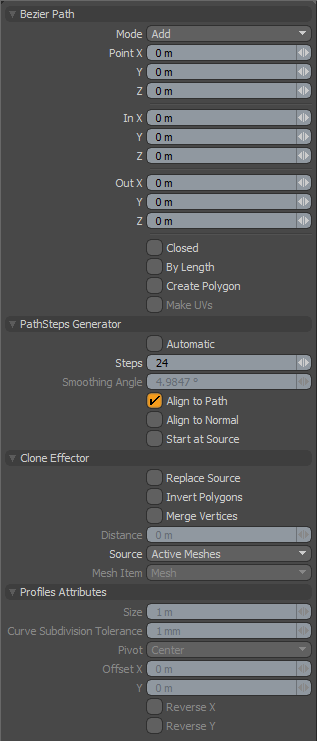 Bezier Path--
Mode: The various bezier curve mode options available are--
Add-- The default mode, when users click in the viewport, additional points are added to the curve. At each control point position two handles extend out that allow users to adjust the curvature of the line between vertices. While drawing users can hover over any point or handle where it will turn yellow, users can then LMB-click and drag the control point or handle to further edit the curve. Control points may be added mid-curve by selecting the preceding control, highlighting it yellow, and clicking the position where the new control point is desired.
Edit-- In edit mode users can freely LMB+click drag and of the control points or handles along the curve to change the look to the desired shape. While pressing the 'Ctrl' key, users may break the tangency of the control handles, allowing for sharp corners, holding 'Shift' while clicking a handle will restore tangency.
Delete-- In delete mode, users can LMB+click on any control point along the curve to remove it from the bezier.
Point XYZ: Users wishing finer point control can assign specific XYZ values in these input fields for the currently selected (highlighted) control point.
In XYZ/Out XYZ: Users wishing finer handle control can assign specific XYZ values in these 'In' and 'Out' input fields for the currently selected (highlighted) control point.
Closed: The 'Closed' toggle option adds an automatic curve segment between the first and last control point positions producing a closed curve.
By Length: When the 'By Length' option is enabled, cloned items will be evenly distributed along the path by length rather than by the span, which may produce uneven placement.
Create Polygon: When the 'Create Polygon' option is enabled, dropping the tool will leave the Bezier Curve path instead of removing it from the scene. This is useful should the user wish to use the resulting curve for additional purposes.
Make UVs: Makes UVs for normal bezier curves that are converted to polygons (disabled for the Bezier Clone tool as it is unnecessary as the curve is not converted to a straight polygon).
Path Steps Generator--
Automatic: When the 'Automatic' option is enabled, modo will assign the number of clones to the path based on the number of control points. Additional control points will produce further clones on the path.
Steps: Available when 'Automatic' is disabled, users can use this value to determine an exact number of clones along the path.
Smoothing Angle:
Align to Path: This option, when enabled, will rotate the cloned items to align along the paths directional vector, meaning the objects will be rotated to match the direction of the path at the clones position.
Align to Normal: When this option is enabled, modo will try to align the direction of the source objects to a straight up position before cloning the source item(s). If the item is already upright when cloned, this option will likely have no effect.
Start at Source: By default, modo will clone items at the actual world position along the bezier curve. When the 'Start at Source' option is enabled, modo will offset each cloned item the distance between the source items center point and the first curve point,producing an effect as if the curve were initiated precisely at the center of the first source item.
Clone Effector--
Replace Source: When this option is enabled, modo will remove the source geometry and position it at the first Point in the path.
Invert Polygons: This option, when enabled will invert the normal direction of the cloned geometry.
Merge Vertices: This option, when enabled will merge coinciding vertices into a single vertex.
Distance: Used in conjunction with the 'Merge Vertices' option, the Distance value determines the maximum distance between vertices where merging will occur. Vertices outside this value will remain unchanged.
Source: Determines the mesh that will be cloned along the Pen tool path-
Active Meshes- This option will use the currently selected geometry as a clone source.
Specific Mesh- This option allows the user to specify a specific Mesh item as the clone source using the 'Mesh Item' option below.
All BG- This option will combine all the currently visible background items cloning them as a single mesh.
Random BG- This option chooses a random background item from all the currently visible background items at each clone position.
Preset Shape- This option allows users to clone Profile shapes from the Preset Browser. Open the Preset Browser 'F6" and select a profile before activating the tool.
Mesh Item: This option works when the Source is set to 'Specific Mesh' and allows users to set the mesh to be cloned.
Profile Attributes--
When users define the 'Source' as the 'Preset Shape' above, the following Profile attribute become active to determine the size and position of the cloned Preset shape.
Size: Determines the size of the cloned Preset Shape.
Curve Subdivision Tolerance: When the preset shapes curve is converted into a polygon once cloned, this option determines the fidelity of that conversion.
Pivot: This option determines the position of the cloned Preset Shape in relation the Point of the path.
Offset: This option provides finer control over the Preset Shapes position in relation to the path itself. This value is additive to the Pivot position specified above.
Reverse X/Y: This option flips the Preset Shape in either the 'X' or 'Y' direction.

