
This command sets a new selection mode and uses the content of the previous selection to set the new selection:
Vertex -> edge: selects edges defined by the selected points
Vertex -> polygon: selects any polygons defined by the currently selected points
Edge -> vertex: selects points of all selected edges
Edge -> polygon: selects polygons that are completely surrounded by selected edges
Polygon -> vertex: selects points of all selected polys
Polygon-> edge: selects all the edges of the currently selected polygons
It is also possible to convert from a Material selection to any of the component level selections or vice versa.
You can convert between selection types using the ALT key. For example, if you have polygons selected in the viewport, pressing the ALT key will change the selection popup buttons on the modo Modes toolbar to read Convert. Press the Convert button where Vertices was previously displayed, and the polygon selection will be converted to vertex selection. This way you can quickly access all the vertices that were part of the polygon selection.
Grow Selection (Shift+Up arrow)
Select > Grow expands or "grows" the selected elements, by selecting all unselected geometry elements directly contiguous with the selection.
Grow selection is mapped to SHIFT+Up arrow so you can quickly expand your selection set.
This command works with all elements of geometry (Vertices, Edges, and Polygons.)
This command is the functional opposite of the Select > Shrink command.
Shrink Selection (Shift+Down Arrow)
Select Shrink reduces the selection by deselecting elements that are at the "outside" of the currently selected elements. This has the affect of "shrinking" the selection set to a smaller size.
The keyboard equivalent of this tool is mapped to SHIFT+Down arrow. This works with all geometry elements (Vertices, Edges and Polygons.)
Select More/Less (Up/Down Arrows)
Selects next plausible element. If a polygon was skipped then the next plausible element select would also skip a polygon.
Selects a continuous span of quadrangular polygons, edges or vertices, depending on selection mode
Invert Selection ("[" -left square bracket)
Accessed through Select menu > Invert, this command switches the state of all polygons, edges or selected vertices.
The selected elements become unselected and the unselected become the selected.
Toggle the selection using the Invert quick key [ (the left hand square bracket).
Select Connected ("]" right square bracket)
The Select Connected command lets you quickly expand geometry selections to include all elements physically contiguous with the selection. This is a very handy workflow for selecting mesh geometry. You simply click to select a single polygon, edge or vertex, then press the "]" key and the entire piece of geometry is selected. While in Polygon or Vertex selection mode you can also simply double-click on a vertex or polygon to select all connected elements.
The Select Between command requires that two polygons or edges are selected prior to triggering the command. Once the command is triggered it completes the selection between the two based on the shortest distance between them. Only a single row is selected if the initial polygons or edges were on the same loop, polygons in adjoining rows or columns would create rectangular selection.
With polygons selected, this command selects all the edges around the boundary edge of the polygon set. If no polygons are selected, it basically selects all the non-manifold edges of the mesh, which can be useful for finding holes.
The mechanism is simply to select all edges bordered by an odd number of selected polygons.
To select a polygon boundary do the following:
1) Select the polygons on the mesh.
2) Press the CTRL key. Notice the Edge button now is labeled "Boundary".
3) Click the Boundary button.
This command is also available on the Select menu > Boundary or from the Statistic tab of the Info & Statistics form, by expanding the Edges > By Boundary entry.
Note that this command works on both continuous and discontinuous selection sets.
Geometric selections can be expanded to include all vertices or edges adjacent to the selection across quads. For example, in a sphere, when a single vertical edge is selected, ring select will highlight all the vertical edges at the same "latitude" around the globe of the geometry. This is the counterpart to Loop selection, which will select all the vertical edges with the same "longitude".
Ring works with both vertex and edge selections.
The Select Close Loop command requires that two polygons are selected prior to triggering the command. Once the command is triggered it completes a loop selection using the two initial polygons to set direction and then selects all polygons on one side of the loop. The selection of the additional polygons is based on which side has fewer total polygons. For instance, to select all polygons on a finger from the knuckle to the finger tip the user would select two polygons just above the knuckle and fire the command. Since the finger itself has fewer polygons than the rest of the hand this is the side that is selected. This is generally the solution the user is looking for, however, in the case that it is the opposite side that is of interest the Select Close Loop command can simply be followed by Select Invert.
Select Colinear
Select Colinear command will select any extraneous vertices across a polygons boundary, making for easy removal. To use, select the command from the menu bar 'Select > Colinear' and a popup dialog will ask you to define a distance. Click OK to execute the command resulting in the selection of all colinear vertices.
Select Coplanar
Select Coplanar command will select the edges between polygons that fall within a flatness range of a selected polygon. To use, select a polygon, and then select the command form the menu bar 'Select > Coplanar' and a dialog box will popup allowing the user to specify a flatness limit. Click OK to execute the command resulting in an edge selection based on the users input.
The select diagonal edges is the command to select edges to share triangle pairs. This is useful when you want to convert triangles to quadrangles. You can convert triangles to quadrangles by deleting the selected edges. Here are options for the command-
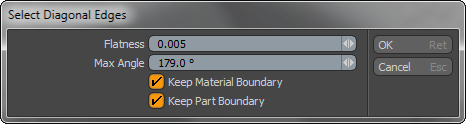
Flatness: The coplanar flatness threshold between opposing triangle pairs designating whether the edge will be selected or not.
Max Angle: The maximum of angle for the corners of quadrangle from the triangle pair.
Keep Material Boundary: When this option is enabled, edges that would fall along material boundary are not selected.
Keep Part Boundary: When this option is enabled, edges that fall along a part boundary are not selected.
Select by Info and Statistics
Users can also select elements by using the Info and Statistics panel.

