
The Preview viewport uses the modo render engine in a progressive refinement mode that allows users to see all changes in a scene with a fully rendered image. This viewport is thread aware so that when it is not the current viewport it will not interrupt interactivity from other views. This allows the user to work on their project without performance degradation yet anytime there are "free cycles" the Preview viewport will begin a progressive render starting at low quality and filling it in to higher quality as time permits. In the Preview viewport users can view changes to the geometry, materials, textures, cameras, lights and even render settings such as ray tracing and global illumination.
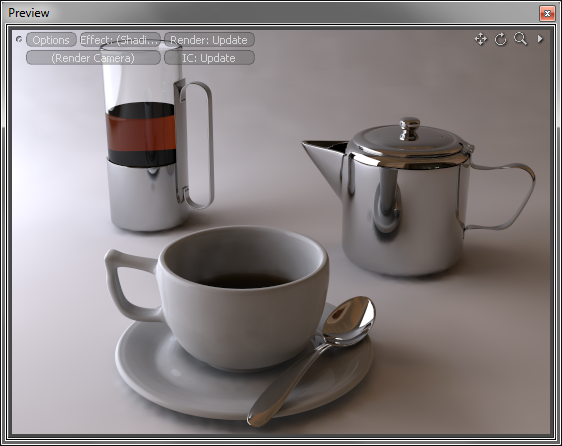
In traditional systems the OpenGL viewport gives a proxy view of the project in real-time and a separate offline render engine (if available) is summoned periodically to generate a full quality image. This offline rendering is a modal effect which requires the artist to completely turn over control of the system to the render engine until the image is complete. This "start and stop" process is a complete workflow killer. Even waiting a several seconds to review a change takes the artist out of their creative flow. The Preview window enables the artist to simply pause to glance at the progress of their project and then continue the process of refining their vision resulting in a much more fluid and art conducive process.
The Preview viewport has three preview "modes" and several options for how much of the project to render interactively and which channels to view. The Types are 'Auto', 'Shaders' and 'Clips'. The Shaders mode tells the Preview to perform a full project evaluation or render whereas the Clips mode only allows the Preview to display images or texture maps that are loaded and selected inside modo's Image List. 'Auto' allows the Preview to display the most recently selected Clip or render item.
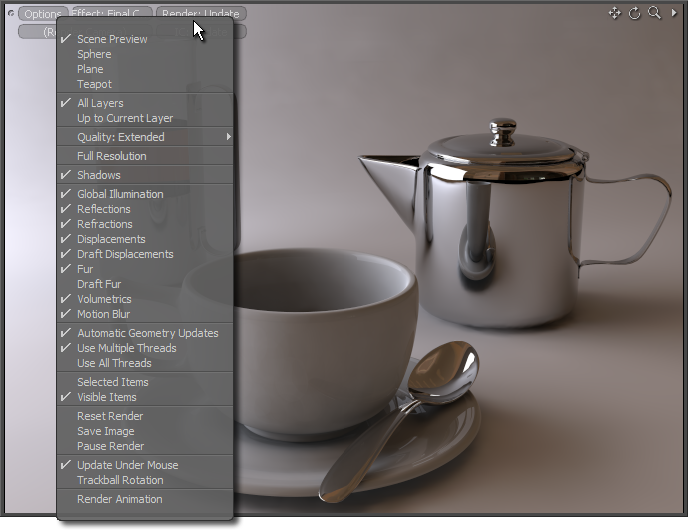
The Preview options provide extensive opportunities to optimize the performance of the viewport by limiting or focusing the rendered data. The first option allows users to choose between a full scene render or a sample primitive including Sphere, Plane and Teapot. These will give lightning fast results and are also very useful for creating material/texture presets before you have any geometry in a project.
The next option, 'All Layers' or 'Up to Current Layer' allows you to determine how much of the Shader Tree the Preview will display. In the default mode all layers are rendered giving the most accurate view of the final image. If you want to focus on a specific texture or material layer for editing you should use the 'Up to Current Layer' setting. In this mode the Preview will only display the currently selected texture or material layer and any that are beneath it in the Shader Tree. This can yield both improved performance as well as improving the focus when editing a particular layer.
The next option allows users to choose the Quality of the preview image, providing options for 'Draft', which throttles some of the most render intensive settings to provide a more interactive view, 'Final Render Quality' which uses the settings of the Shader Tree to determine quality and finally 'Extended Refinement Passes' allows the Preview render to continue to add refinement to the image even when the maximum number of visible pixels has been achieved. In this case the Preview will begin to add antialiasing effects to the image. It should be noted that the direct rendering in modo (Render command) will generally yield better results in a shorter overall render time.
The 'Full Resolution' option allows users to render a preview at the same resolution as specified in the Render Items 'Frame' options. When this option is enabled, the 'Alt+mouse combination' shortcuts will navigate the image itself, rather than the viewport. However, the viewport navigation widgets will still operate as normal.
There are several visibility toggles for various Effects. They include 'Shadows', 'Global Illumination', 'Reflections', 'Refractions', 'Displacements', 'Fur' (with an option for "Draft" or low res on fur and displacements), 'Volumetric' and 'Motion Blur'. By default these are all set on. Disabling specific effects will typically improve performance. The Draft options will force modo to use a smaller amount of micro-polygon tessellation in the Preview viewport. Micro-polygon displacement can generate millions of polygons at the time of render and as such has a significant setup time requirement making it difficult to Preview this effect interactively. Draft options will reduce the total amount of polys generated improving performance. Also, once the mesh has been tessellated the Preview can display lighting, camera and shading changes very rapidly. Only mesh edits will force the tessellation to occur again.
'Automatic Geometry Updates' indicates to the Preview to constantly keep the mesh data in sync with the current state of the mesh. Deactivating this setting will "lock" the mesh in its' current state and only allow material, lighting and camera edits.
'Use Multiple Threads' will allow Preview to render with multiple cores or processors. However, since the idea behind Preview is to allow it to cooperate with the modeling, lighting and painting processes it is recommended to leave this option off so that the other cores or processors are available for interactive work. 'Use All Threads' will maximize the thread use of the viewport providing the best overall performance for the preview window.
The 'Selected' or 'Visible' option allows you to chose which items will appear in the Preview render. The default Visible setting will render all item in the project that have their visibility setting on. To remove an item from Preview in this mode you simply click the eyeball icon in the Item List. When this setting is on, Selected Items the Preview will only render the currently selected items. This is a very convenient way to isolate certain item(s) for Preview.
'Reset View' will simply reset the render state including refreshing the mesh data. 'Save View' will save the current state of Preview to an image file. 'Pause View' stops rendering and leaves the view in the state at which the view was paused.
'Update Under Mouse' provides users a means to control, to a degree, where modo should spend its efforts when updating a fresh preview. Enabling this feature will allow users to simply hover the mouse pointer over the preview viewport in the area of greatest interest (wiggling the mouse pointer over the target area will help). modo will then concentrate additional effort in this area to update faster. When disabled, the available CPU cycles will be evenly distributed across the entire image.
The 'Render Animation' option uses the Preview renderer to render animated sequences, and it works the same as using the "Render > Render Animation" command with two exceptions: 1) You can only render the currently active pass (as opposed to specifying a 'Pass Group'), 2) You specify how long you want the whole render to take. It will evenly divide this time up between each frame, and for each frame will progressively refine until time is up (or the frame finishes, which can definitely happen if you're in Final or Draft mode).
Below the Preview options button is a Camera pop-up selector allowing the user to easily select the current camera for rendering, without the need to specify it specifically in the Render Item. Directly next to the options is an 'Effect Button' that allows the user to define a specific rendering channel for previewing, allowing for a number of diagnostic possibilities, such as previewing the amount of Fresnel reflectivity on a surface. Additionally, users can toggle the visibility of a selected layers contribution to a scene, visualized as an semi-transparent overlay by enabling the "Current Layer Overlay" option. Once enabled it displays the current texture as an overlay on top of the render, visualizing the raw value unaffected by things like 'Blending Mode', 'Opacity' or shading. So if you have an image map on the Subsurface Color channel, it will display the raw color of the map. For 'Groups' it displays the group mask opacity. This is very handy to resolve texturing issues and see what each layer is contributing to the final render.
Visually Selecting Shader Tree Layers--
![]()
To make it easier to find a particular surface, users may RMB-click over any area of the preview image itself, opening a popover menu displaying all shader tree layers that contributed to the pixel directly under the mouse pointer when the RMB was pressed. Clicking on any of the layers in the dialog will select them in the shader tree.
Navigating in the Preview--
Navigating the camera around in the Preview window works just like any other 3D GL viewport, with the additional ability to define a rectangular area by pressing Ctrl+Alt+RMB to define a box area for zooming. You may wish to zoom in for a closer look without affecting your cameras position, it is possible if your mouse has a middle scroll wheel, first, press and hold the shift key on the keyboard, then place your cursor over the center point of where you'd like to zoom toward and roll the wheel. To reset the view, use the Render Done/Hold button at the top of the viewport.

