
The 'Preset Browser' is a library of pre-defined objects, surfaces and settings organized and categorized for quick visual browsing, greatly speeding up scene creation. Presets are applied to the scene using simple drag and drop operations in the case of materials and objects. For profile presets, both 2D and 3D, one simply needs to select the profile within the browser before activating the modeling tool. Users can also easily create their own library of commonly used objects and settings for streamlined application to their own scenes.
Navigating the Browser--
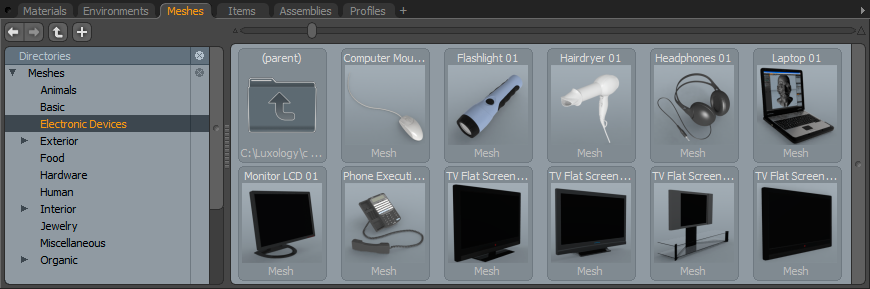
There are a number of functions for navigating through the preset library itself. First off you want to make sure that you have the content folder installed and that the Preset Browser is pointed to it on your hard drive. You can add the path to the browser using the '(add path)' function found in the directory tree or the small directory bar across the top. The default assets are typically located in the "[drive]\[modo folder]\content\Assets\" folder where you installed the content folder included with modo.
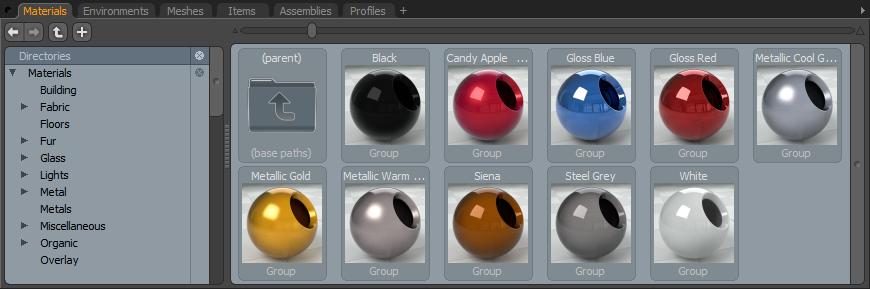
Depending on your amount of screen real estate there are several methods for browsing the folders associated with presets, one is the Directories tree, the left most column in the above image. If it's not there, you can make it visible by LMB-click drag to the right of the inside edge of the left side of the viewport, there is a tiny row of squares there, you'll know you're on the right spot when the cursor changes to two opposing arrows. In the case of the material browser, there are a number of folders you can see now that organize associated presets. The small triangles to the left of the folder names will expand/collapse any sub folder and clicking the folders themselves will display their contents in the main browsing window. The far right column with the 'X' icon over it will display an 'X' next to added preset directories, clicking it will allow the user to remove these directories from the tree. If you prefer not to use the Directories tree, you can collapse it by LMB-click on the right hand edge of it and dragging to the left until it disappears. One can also navigate through the various folders using the iconic buttons in the upper left of the window -they are forward, backward, parent and New directory respectively. RMB-click on either the forward or backward buttons to get a context menu of available folder names. If the Dir Browser is hidden and the viewport is set to not display thumbnails, a popup containing the path hierarchy is displayed between the navigation buttons and the zoom slider. Changing thumbnail modes is done via Viewport Settings, which can always, never or conditionally (depending on if the Dir Browser is shown) show folders as thumbnails.
The zoom slider across the top of the viewport allows for smoothly scaling the size of the icons in the browser. When the number of items in the window exceeds the amount of space available, the scroll bar down the right side can be used to scroll through numerous selections.
Applying Presets--
Materials: Applying material presets couldn't be easier. You can select a number of polygons and either LMB-click drag onto the selection or just double click the material preset itself and the polygons will be tagged with the appropriate surface name and applied in the shader tree. If you've already tagged all your surfaces using the 'm' keyboard shortcut, that's even better, you can just drag and drop any of the material presets onto the surface and the appropriate material will be updated in the shader tree. For presets with associated image maps that require UVs, if no UVs are present, the material will default to cubic projection. Presets can also be dragged and dropped directly onto group items in the Shader Tree itself.
Environments: Environment presets can be added to a scene by simply double clicking on the preset of your choice. This automatically adds it to the environment item of the shader tree. If you don't have a preview window visible, you may need to render the scene to see the effect of an environment preset.
Meshes: Mesh presets can be applied to a scene just as easily as any other type of preset. If a preset is dragged onto an empty part of the scene, it will automatically position itself appropriately in relation to the workplane becoming its own mesh item layer. If the preset is dragged over geometry (for example a light fixture onto a wall) the item will align itself to the polygon it was dropped onto and becomes part of the same layer. If one simply double clicks the preset, the item will be created at the origin (0,0,0 position). Once inserted, a mesh preset is just like any other geometry in a scene and becomes fully editable.
Profiles: Profile presets work with many modeling tools and can be simply applied by first selecting the profile you wish to use and then invoking the appropriate tool, say for instance the bevel tool. With the tool in interactive mode, you can see the effects of the profile added to the bevel as you drag it out. Selecting any other profile will update the bevel profile instantly allowing users to try out different settings before dropping the tool.

Render Settings: modo provides users the ability to save the 'Render Item' settings, such as Frame Size and Resolution, Antialiasing, and the Global Illumination settings as a 'Render Preset', making it easy for users to define commonly used default values and then apply them quickly to new scenes, without the need to change multiples of settings manually. Camera Items may also be included in these types of presets. To apply a "Render Preset' users need only to LMB+double click over the target preset in the viewport to apply it to the currently active scene. Once applied, the Render Items updates reflecting the new values. An additional 'Camera' item defined by the preset may be added as well.
There are probably a number of items you create for every scene, a ground plane, a certain environment gradient, or maybe a specific material. Creating your own presets is a great way to streamline a workflow and speed up scene creation eliminating repetitive task so you can concentrate on the important stuff.
Materials: Any layer in the shader tree can act as a preset. If you RMB-click on a layer, and select 'Save Preset..." from the drop down menu where you will be presented with a file save dialog asking where you'd like to save your preset. If you want the preset to show up automatically in the existing set, you'll need to navigate to the directory where your presets are stored and save within that directory, one can also create a new directory for saving presets, but make sure to use the '(add path)' command so you can see them within the browser viewport. I'm sure quite often you will have a surface made up of multiple texture layers, in that case you will want to make sure to create the preset from the material group (![]() ) , as that will include all associated texture layers within the preset. Don't forget that Fur is made up from texture layers so making hair presets is just as easy as making surface presets.
) , as that will include all associated texture layers within the preset. Don't forget that Fur is made up from texture layers so making hair presets is just as easy as making surface presets.
Environments: Environment Materials can also be saved as presets by RMB-clicking on the environment material layer and selecting 'Save Preset...' Just as with materials, you will be presented with a file save dialog asking where you want to save your preset. If you want the preset to show up automatically in the existing set, you'll need to navigate to the directory where your presets are stored and save within that directory, one can also create a new directory for saving presets, but make sure to use the '(add path)' command so you can see them within the browser viewport.
Meshes: Mesh presets require a small amount of setup for them to work properly. Mesh presets align themselves based on their relationship to modo's origin when they are created, therefore it is recommended that one create mesh presets at modo's origin point. You'll also want them resting on the ground, so they are facing the Y up (positive) direction. That way when you create say a light fixture that you are applying to a series of walls, each one will be properly aligned to the wall in the proper orientation when placed. Note that item transforms are not considered in presets, so make sure you make your alignment changes at the component level, otherwise use the Freeze command in the items properties tab. Once your model is properly positioned, one only needs to RMB-click on the mesh item layer in the item list viewport and select 'Save Preset...' where you will be presented with a file save dialog asking where you'd like to save your preset. If you want the preset to show up automatically in the existing set, you'll need to navigate to the directory where your presets are stored and save within that directory, one can also create a new directory for saving presets, but make sure to use the '(add path)' command so you can see them within the browser viewport.
Render Presets: Users can easily save the settings of the Render Items, which contains core rendering attributes such as 'Frame', AA and ray trace 'Settings' and 'Global Illumination' settings, by simply LMB+clicking on 'Render Item', the top-most item of the 'Shader Tree', to select, then RMB+Clicking on the item to open the context menu and selecting the 'Save Preset' option. Additionally, users may select the 'Render Item' and invoke the menu bar command "File > Save Item Preset". Either way opens an OS specific 'File Save' dialog. If you want the preset to show up automatically in the existing set, you'll need to navigate to the directory where your presets are stored and save within that directory structure; one can also create a new directory for saving presets, but make sure to use the '(add path)' command so you can see them within the browser viewport.
If a 'Camera' item is also selected when the preset is saved, then that camera and its associated settings will become part of preset and when applied will be added to the scene in addition to any existing cameras. Useful to set-up automatic DOF and motion-blur cameras.
Profiles: Profiles are based off of a curve drawn in modo. You can create them in a number of ways, including the curve tool, bezier curve tool or the sketch tool. Once you have your profile curve defined, select it and in the menu bar select the command 'Geometry > Profile > Save...) where you will be presented with a file save dialog asking where you'd like to save your preset. If you want the preset to show up automatically in the existing set, you'll need to navigate to the directory where your presets are stored and save within that directory, one can also create a new directory for saving presets, but make sure to use the '(add path)' command so you can see them within the browser viewport. Once you click 'Save' you will be presented with this dialog box...

The 'Preset Filename' will contain the name you specified in the previous file save dialog, so it shouldn't be necessary to edit it here, 'Axis' specifies the plane which the profile was created on, either X, Y or Z. 'Dimension' specifies to modo whether the drawn profile is '1D' or '2D'. 'Label' and 'Caption' are pretty self explanatory, and will appear above and below the profile respectively in the preset library window. The 'Centering' toggle will automatically center the curve when enabled (if it was created away from the origin). Click OK to finalize saving of the profile.
Customizing the view--
By RMB-clicking on a preset icon, users are presented several options for managing presets as well as customizing the icon display.
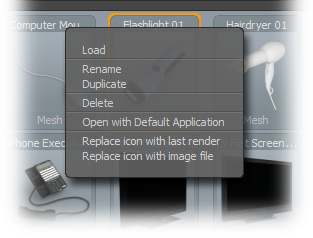
Load: Will load the currently selected preset into the scene, for mesh presets, this will create a new item centered at modo's origin. For materials, you need to select a material group in the shader tree before the material preset will load in this way.
Rename: Allows the user to apply a new label to the preset, replacing any previous labels.
Duplicate: This command will pop up a dialog box requesting a new filename for a new duplicate preset file.
Delete: Will remove the currently selected preset. Note that this also removes the file from the hard drive.
Replace icon with last render: Will embed last 'F9' render into currently selected preset item.
Replace icon with image file: Will embed a saved image file into the currently selected preset item.
By RMB-clicking on the preset browsers tab and selecting viewport settings, the user is offered some options to customize the way presets display within the window.

The 'Set Client Identifier' option allows a Preset Browser to have its own unique selection. This is most useful when configuring a preset browser to be used with a specific tool; for example, this is how the Polygon Bevel tool knows which of many possible Preset Browser viewports to use (in the case of Polygon Bevel, the browser viewport is embedded right in the Tool Properties viewport). Note that each tool must be specially coded to look for a specific client identifier, and thus this feature is only really useful to tool developers (which, at the moment, is only us).
The next three options control how directories themselves (folders) display within the viewport and are self explanatory.
"Use Alternate Input Map" tells the browser to use a different input map from its default. In a standard configuration, the default input map applies presets on a double-click of a thumbnail, while the alternate input map applies a preset on a single click, mimicking the behavior of the 360 application.
Finally, the last three options deal with how the presets are displayed, List is a strict listing of the object names, and thumbnails can be displayed cascading horizontally or vertically.
Adding Your Own Preset Tab--
If you wish to further customize the tabbed Presets Browser to your personal workflow, such as creating a repository for project specific presets, adding your own preset tab to the workspace is a relatively easy task. First, navigate to the preset browser itself, to the right of the 'Profiles' tab in the default configuration, there is a little 'plus' sign (+) for adding additional tabs, LMB-click on it. Within the pop-up, select 'Data Lists > Presets Browser' and a new tab will be added to the right side of the existing tabs. Now, RMB-click on the tab where it says 'Preset Browser' and in that pop-up, select 'Viewport Controls > Rename Tab' and type the name you'd like to use in the window. From there you can display a custom folder of presets by navigating with the standard controls to your preferred directory.
Working with Replicators--
Mesh presets are fully compatible with Replicators, though are not automatically applied as such. To use a preset mesh as a replicator, double click the mesh object in the Preset viewport so it will be created as its own mesh item at the origin. Then, in 'item mode', select the Point Source and the newly created preset item mesh and create the replicator in the usual way --menu bar "Item > Add Replicator" Please reference the Replicator item for more information on working with replicators.

