
Animating in 3D, in some ways can be very similar to the art of stop motion animation, where you build a model, place it in a scene, light the scene for atmosphere and then animate the model to bring it to life. However, unlike stop motion animation where the animator must move the model a tiny amount and then take a picture for every frame, in 3D animation, one can easily skip multiples of frames and lock in a fixed value, called a keyframe. Between those skipped frames the computer interpolates from one value to the other. The Graph Editor controls how the system interpolates those in-between values.
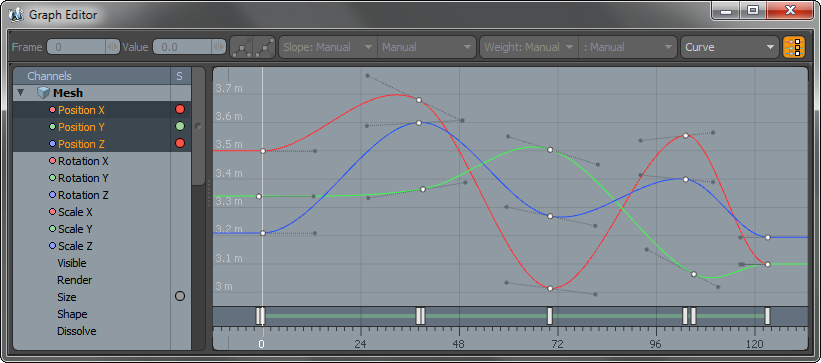
Not only for transforms, such as position, scale and rotate, nearly any property of any item can be animated in this way, by keyframing the values of an items channel. Channels are simply the animateable properties of any item, gathered together in list form. Generally, users interact with channels within the channel viewport, but since channels are so essential to the graph editor, the very same channels appear when an item is selected in the left most column. Channels can be selected individually with a LMB click over the channel name. Multiple channels can be edited at the same time as well. Non-sequential channels can be selected using a Ctrl-LMB click on the various channel names, or sequentially with the shift key modifier and clicking the top and bottom most channels. When a particular channel is selected, its animation curve (as it is usually referred to, regardless of its actual shape) is displayed in the graph area. If no keyframes keyframes are defined, it will appear as a flat dotted line. Once a keyframe is created, it will appear solid.
The graph area is where the actual values are manipulated. In this graph, left to right always represents time, but up and down changes depending on the channel type selected. The line that connect the individual keyframes represents the values changing over time. By default, modo uses a smooth curve to interpolate between keyframes values, providing a nice ease in/ease out type of effect; but there will be times when one will want a very different interpolation style or simply finer control of it. Animation curves can only be changed by manipulating the keyframes and are very similar to working with bezier curves in the modeling viewport. Keyframes are represented as tiny dots along the line -white for selected channels and line colored for unselected channels. Keyframes with broken tangency will display in a magenta color. Existing keyframes can be edited by first selecting the key you wish to edit. Click over the dot to select, or LMB drag a marquee around one or more dots. Once selected, the dot will turn orange with a white outline. New keyframes can be created by MMB clicking. Values and Frame position can be changed by LMB-click dragging over any selected keyframe and moving it to the new frame/value position.
Navigating the graph area view itself is just like navigating any of modo's other viewports, Ctrl+Alt+LMB drag to scale the window, Alt+LMB drag to scroll. All keyframed values can be quickly brought in to view with the 'A' (view all) shortcut key or Shift+A (view selected).
A selected keyframe's position in time, 'Frame' and 'Value' appear in the upper left hand corner where new values can be entered manually via the keyboard. You may also have noticed that the various buttons across the top become available when a keyframes is selected.
![]() Break Slope: Breaks the curve handles at the tangency point allowing a sharp corner interpolation across the keyframe. When tangency points are broken, there is the opportunity to adjust both 'In' and Out' parameters for the keyframe.
Break Slope: Breaks the curve handles at the tangency point allowing a sharp corner interpolation across the keyframe. When tangency points are broken, there is the opportunity to adjust both 'In' and Out' parameters for the keyframe.
![]() Unify Slope: Unifies the curve handles at the tangency point forcing a smooth interpolation across the keyframe.
Unify Slope: Unifies the curve handles at the tangency point forcing a smooth interpolation across the keyframe.
Slope: The slope controls lets the user specify the animation curves interpolation type on a per keyframe basis. If the tangency is broken, the left button controls the incoming value, and the right controls the outgoing. If the tangency is unified, only the left slope control will be enabled.
Manual- User can manually adjust curve using the handles. Clicking the dots at the end of the curve will edit their length and position.
Auto- modo automatically angles the curve handles to produce a smooth ease-in/ease-out interpolation.
Linear In- Points the incoming curve handle toward the previous keyframes value for a linear type effect.
Linear Out- Points the outgoing curve handle toward the next keyframe value for a linear type effect.
Flat- Flattens curve handles horizontally for the smoothest in/out interpolation.
Auto Flat- Adjust the curve handles based on timeline position.
Stepped- Adjust curve so value will jump at keyframe position.
Weight: Adjusts the length of the curve handles to control the curves length across the keyframe, longer handles will 'ease' a keyframes value to a greater degree than a shorter handle. If the tangency is broken, the left button controls the incoming value, and the right controls the outgoing. If the tangency is unified, only the left weight control will be enabled.
Manual- User can manually drag out handles length to set the weight of the curve
Auto- Locks the handles length automatically adjusting it for smooth interpolation based on keyframes distance apart.
Curve: Adjusts the animation curve type for the entire channel. 'Curve' is the default behavior, 'Linear' interpolates as a straight line between keyframe values, and 'Stepped' will keep values constant until the next keyframe position in the timeline, jumping to the new value.
![]() Link Keys: When the 'Link Keys' button is active (its background will change to orange), associated keyframes will remain linked together in time, meaning that, for properties like Position, Rotation and Scale that each have associated X,Y and Z values, editing a single axis value, by moving it forward or backwards in time, will keep all the keyframe positions linked together as if all 3 were selected. When inactive, only the selected channels will be modified.
Link Keys: When the 'Link Keys' button is active (its background will change to orange), associated keyframes will remain linked together in time, meaning that, for properties like Position, Rotation and Scale that each have associated X,Y and Z values, editing a single axis value, by moving it forward or backwards in time, will keep all the keyframe positions linked together as if all 3 were selected. When inactive, only the selected channels will be modified.
Contextual Menu--
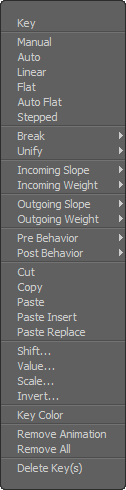 When RMB+clicking on a key value opens a context menu with a number of options for working with the keyframe data.
Key: Sets a keyframe at the 'current time' as specified by the timeline.
Manual/AutoLinear/Flat/AutoFlat/Stepped: These adjust the slope of the selected keyframe(s), same as when adjusted with the slope menu.
Break: Several options are offered to break the tangency of the keyframe's slope. Same as menu above.
Unify: Several options are offered to unify the tangency of a keyframe's 'broken' slope. Same as menu above
Incoming Slope: Adjusts the incoming slope of the keyframe. Same as menu above
Incoming Weight: Adjusts the incoming weight of the keyframe. Same as menu above
Outgoing Slope: When tangency for a key is broken, this adjusts the outgoing slope of the keyframe.
Outgoing Weight: When tangency for a key is broken, this adjusts the outgoing weight of the keyframe.
Pre Behavior: Sets the channels behavior prior to the first keyframe in a sequence.
Constant- The value of the first keyframe is maintained, with the outgoing slope smoothly interpolating toward the next keyframe value.
Stop- The Value of the first keyframe is maintained, with a linear outgoing slope producing an abrupt transition.
Linear- Incoming slope will linearly match the vector direction of the first keyframe.
Repeat- Repeats the entire sequence of keyframes.
Oscillate- Repeats the entire sequence of keyframes, alternating between backwards and forwards for a ping-pong like effect.
Offset Repeat- Repeats a sequence of keyframes offsetting each sequence by the value of the last key.
Reset- Sets the incoming area outside of the keyframe sequence to a value of '0'.
Post Behavior: Sets the channels behavior after any sequence of keyframes.
Constant- The value of the last keyframe is maintained, with the incoming slope smoothly interpolating toward the last keyframe value.
Stop- The Value of the last keyframe is maintained, with a linear incoming slope producing an abrupt transition.
Linear- Outgoing slope will linearly match the vector direction of the last keyframe.
Repeat- Repeats the entire sequence of keyframes.
Oscillate- Repeats the entire sequence of keyframes, alternating between backwards and forwards for a ping-pong like effect.
Offset Repeat- Repeats a sequence of keyframes offsetting each sequence by the value of the first key.
Reset- Sets the outgoing area outside of the keyframe sequence to a value of '0'.
Cut/Copy/Paste/Paste Insert/Paste Replace: Options for managing keyframes through a clipboard. Users can select a number of keys, 'Copy' them and then 'Paste' the values elsewhere in time. 'Cut' removes keys to clipboard, 'Copy' duplicates them to the clipboard. 'Paste' merges the keys into the destination channel, 'Paste Insert' inserts the keys, moving existing keys to make room, and 'Paste Replace' overwrites the keyframes across the range of the copied keys.
Shift...: This command offers the user a pop up window with options for shifting or moving the time of a selection of keyframes.
Value...: This command offers the user a pop up window with options for setting a specific value on a sequence of keyframes.
Scale...: This command offers the user a pop up window with options for scaling the value of a selection of keyframes.
Invert...: This command offers the user a pop up window with options for inverting the time position of a sequence of keyframes.
Key Color: Opens the system's color palette allowing the user to specify a color value for a keyframe position.
Remove Animation: Removes all keyframes, keeping the incoming value of the first key on each channel.
Remove All: Removes all keyframes resetting all channels values back to default '0'.
Delete Key(s): Deletes the currently selected keyframe(s).
The timeline across the bottom is functionally identical to the timeline in the Animation layout. LMB clicking and dragging will change the current time. As you drag the current time value around, you can see the effect of the animation curve in the 3D viewport. Handles appear in the timeline wherever a keyframe appears, and can be LMB-dragged in time forwards or backwards modifying the position of the keyframes for selected channels.

