
modo provides one of the most, if not the most flexible UI of any 3D application, providing a variety of controls allowing users to customize the program to their liking. The controls to do so are simple and allow users a great degree of flexibility. When creating a completely custom layout, the first thing to do is define a new layout with which to modify, this ensure that the system defaults are not mistakenly changed.
To do this, go to the layout controls in the menu bar "Layout > Save As..." and in the popup requestor enter a unique layout name.

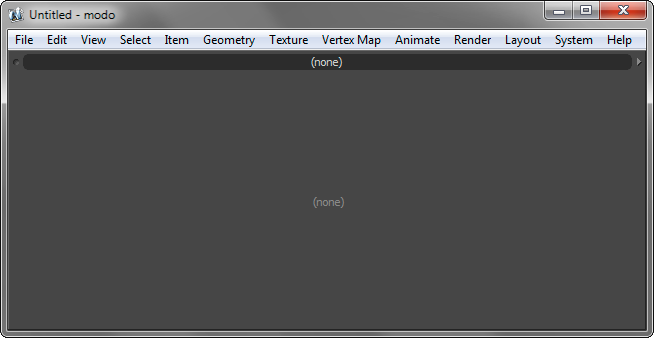
Press 'OK'. Next, load the interface to make it active by selecting the "Layout > Layouts > [MyCustomLayout]", it will appear at the bottom of the list. Selecting it makes it active, although nothing will have changed because the new interface is a saved version of the previous. Now go back and select "Layout > Clear" and you'll have nothing but a gray window with a menu bar, like this...
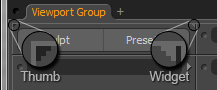
The controls to customize the layout are all that are left within the viewport. In the upper left corner, below the menu bar, you'll notice a tiny shaded dot next to the title bar, this is called the 'Thumb'; viewport frame specific controls all reside here. On the opposite side of the title bar rests a small right facing arrow called the 'Widget', this is where users control the contents of a frame. Popup menus from both are accessible from a RMB+click (right mouse button click). Every window has these controls making it easy for users to modify any layout to their liking.
To finish our little exercise, we'll continue recreating a single tab of the default interface. To do that, the interface will need to be divided. For the first step, select the Widget arrow, and from the menu choose 'Viewport Group', this nests two viewports inside one another. Now you'll notice two widgets on the right, for the upper widget, select the 'Tabbed Viewport' option from the menu. This is the makings of the tabbed interface, where each tab holds a different focused layout. In the nested viewport below, RMB+click the Thumb, and from there choose the option 'Split Vertically'. This divides the window into two equal sized viewports stacked on top of one another. The viewports can be resized by hovering the mouse pointer directly over the border between the frames, LMB+click and drag to position the edge in a new location. Dragging the border toward the top makes the first viewport. To finish off dividing the windows, follow this diagram, splitting viewports horizontally or vertically, as necessary.
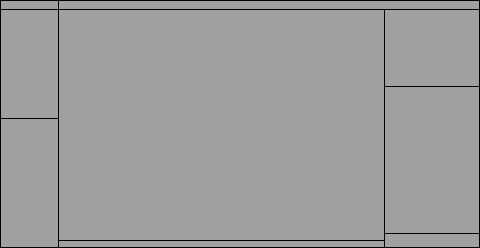
The top most bar was split horizontally once, and the lower window was split horizontally twice, resulting in three columns. Each of those columns was split vertically once, with an additional split in the right column. Position the viewport frames so the layout loosely mimics the above template. If you accidentally split a viewport, don't worry, you can easily delete viewport panes from the Thumb menu command 'Delete'.
Next we will populate the windows with content. The most common viewports are easily accessible form the Widget arrow on the right side of the title bar of each viewport. RMB+click on them and then select the viewport type from the popup menu. We'll travel in a top to bottom, and left to right fashion filling in the viewports. In the first viewport, select "Form View" first from the top of the Widget menu, this changes the window to a generic form but it still looks empty, so again from the Widget, choose the menu option "Viewport Settings > Sculpt and Presets Quick Access". This adds the quick access buttons to the viewport, but the pesky title bar gets in the way. This is removed from the 'Thumb', RMB+click and select the option 'Min Header' to minimize that. Don't worry, the 'Thumb' and 'Widget' haven't disappeared, they are just very tiny triangles in opposing corners of the window illustrated below.
A little harder to see now, but there non-the-less. That window is finished, so in the next below it, RMB+click the widget and select "Toolbars > modo Tools" and again minimize the header. Below that window in the next frame, select "Properties > Tool Properties" and again minimize the header.
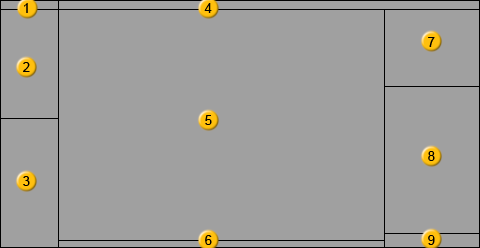
For the remaining six windows, the menus are as follows--
4.) From the Widget -> "Form View" and then again "Viewport Settings > modo Modes".
5.) From the Widget -> "3D Edit > 3D Model View"
6.) Widget -> "Status Feedback"
7.) Here we'll add some more Tabs, so select from the Widget "Tabbed Viewport" and them RMB+Click on the tab itself and choose "Data Lists > Item List". Click the "+" icon to the right of the tab and then choose "Data Lists > Shader Tree", that adds an additional tab.
8.) Viewport 8 is kind of a special case, as it serves multiple purposes, with nested viewports, similar to the main window. So from the Widget, select "Application > Viewport Group", and like before, set the upper widget to "Tabbed Viewport" and split the lower window twice for 3 even sized viewports. In the top viewport, set "Data Lists > Vertex Map List", in the next window down set "Data Lists > Tool Pipe" and in the third, set "Info > Info and Statistics". Next, across the top of the group, add an additional tab like before and select "Properties > Item Properties". Minimize the Header in all the viewports you just created (as before with the Thumb), forgoing the rest of the tabs for now.
9.) From the Widget -> "Utility > Command History".
That pretty much re-creates the modeling view of the default interface (less a few tabs for brevity), from an essentially blank slate. Make sure to save it again using the 'Save As..." command and select the same name you established at the beginning of the tutorial. Closing modo will force if to be written to the config file ensuring it is saved for future sessions.
Between the commands of the 'Thumb' and the 'Widget', a great deal of customization power can be wielded. Any viewport from modo can be recalled from the Widget arrow, although some are available only within the 'Viewport Settings' submenu choices. Another option users should be aware of is that many viewports will change when scaled, providing slightly different ways of interacting with the info contained therein. These options can be useful in setting up interfaces that mimic other popular applications. A thorough understanding of the common viewports will help in achieving your intended result.

