
Morph maps offer users a means of saving alternate user-defined deformations for any mesh. Individual morph map deformations can be animated over time providing the ability to animate say for instance facial expression. In order to animate any morph map, a morph deformer must first be applied to the model.
Applying a Morph
Before a morph can be applied, it needs to be created. New morph maps are added using the 'Vertex Map List' viewport. Any modifications made to the map while selected will be stored in that Morph Map. For more information on creating Morph Maps, please reference the 'Working with Vertex Maps' page of the documentation under the Morphs section.
To apply a morph to a mesh, for the purposes of animation, users can select the target Mesh item in the Items list and RMB+click on the item name to open the contextual menu. In the menu, select "Add Deformer > Influences > Morph Influence", this automatically add the Morph Influence item, connecting it to the mesh. Users can also select the 'Morph' option from the 'Animate' and 'Setup' toolboxes, under the 'Deformers' subtab. Once applied, users can access the attributes by selecting the Morph item, and viewing them within the Properties panel. Each Morph Influence will support a single morph map, so for multiple maps, additional Influences will need to be added. Combined morph maps are additive, so all will blend together appropriately providing predictable results. Additionally, the morph 'Strength' value can be driven beyond 100% (or into negative values) producing interesting results.

TIP: One of the most confusing aspects of working with Morphs is the fact that when modeling a Morph appears automatically in the 3D viewport when simply selected, but does not under the Animation and Render interface tabs. In order to actually see and animate a Morph, users need to apply the Morph Influence and set its strength to some value above 0. Additionally, the viewport option 'Enable Deformers' need to be selected.
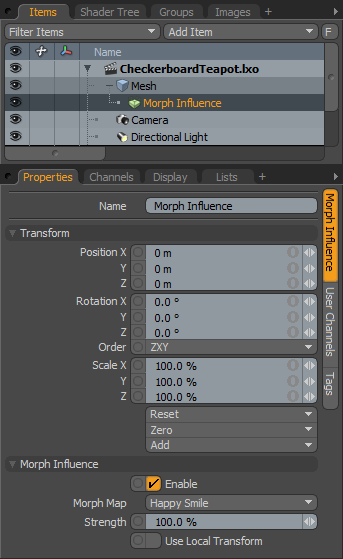 Name: This data field displays the current item name. Users may easily change it by LMB-clicking within the field and typing the new name.
Transform--
(Transform values will change the position of the Influence items locator, but has no affect over the Morph itself)
Position: An Item transform that allows the user to numerically position the influence item in XYZ space.
Rotation: An Item transform that allows the user to numerically set the rotation of the influence item.
Order: Allows the user to set the order that rotations are applied to the Influence item.
Scale: An Item transform that allows the user to numerically set the size of the influence item.
Reset: Resets the selected transform values to (0,0,0) returning the items back to their default state.
Zero: Resets the chosen transform property values to '0', leaving the 'Center' position and Item position intact.
Add: The 'Add' function will add the selected set of transforms to the channel list. Useful when animating complex motions, providing a layered approach to the transforms.
Morph Influence--
Enable:Toggles the effect of the layer on or off. When unchecked (disabled), the layer has no influence on the scene. However, disabled layers are still saved with the scene and its values are persistent across modo sessions.
Morph Map: This option is used to select the target Morph vertex map.
Strength: This control allows users to modulate the strength of the Morph. At 100%, mesh will be deformed fully at the morph state.
Use Local Transforms: Adjusts the offsets of the Morph so that they deform in the local coordinates. This is useful in creating corrective Morphs when coupled with other deformers.

