
The Track View allows you to easily view and edit all the keyframes in an animation and can be accessed by expanding the timeline up when in the Animate layout.
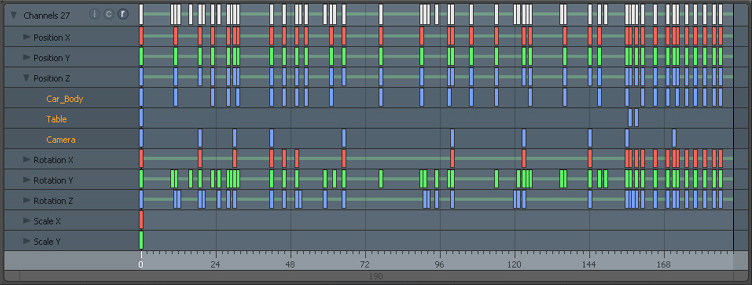
Keyframes can be viewed inside of Track View in three different ways. Selecting an Item will display it's keyframes in a summary view. This allows you to easily edit all the keyframes of a specific Item or group of Items. To access individual channels you need to expand the Item group. Alternatively selecting the round "C" radio button in the Track View will change the display so it is based on channel type, and accessing the channel for a specific Item requires you to expand the channel group. Finally selecting a specific animation channel or group of channels will display those channels directly in the Track View. Which method you choose depends on the type of edit you wish to make.
To select keys simply click on them with the LMB or drag out a shaded rectangular selection area with the LMB. Selected keys are by default, shown with a yellow highlight. The key on the topmost row is a "master" key that provides a handy way to affect all keys at a specific frame, so if you move the master key all keyed information below it will be affected. Similarly, if you move the key for say Position X, the "master" key is automatically affected and will be moved along with your Position X key. To add to a selection hold down Shift as you select, and conversely, to delete from a selection hold down the Ctrl key. With a selection made you can then move that selection along the timeline to the left or right. The number of frames that you have moved is shown in real time in the upper left of the Track View (positive numbers above the zero start frame indicate you are moving to a later time). Using the RMB when doing this avoids having to LMB click on a specific key. If you want all of the keyframes after the selection to move in relation to the selection then activate ripple editing by clicking the "r" radio button at the top of the Track View. Please note that if you are using the RMB in ripple mode, you will need to RMB down inside the active key zone (indicated by horizontal green bars) in order for the ripple mode to be in effect.
Scaling keyframes requires you to have at least two keys selected and there are two ways of doing it. Holding down Shift and the RMB will allow you to scale (spread out) the selection from the cursor location. You will see the amount of the scaling operation in the upper left of the Track View as you move your cursor. Holding down Ctrl and the RMB allows you to scale a set of keys from the position of the last or the first selected keys depending on which side of the selection your curser is located. For example, if you want to keep the first key (in time) in a fixed position and scale the other keys in the selection relative to it, then you would hold down CTRL and RMB down to the right of the key selection and scale them by dragging them to the right or left. Conversly if you want to scale a selection relative to the last selected key hold down CTRL and RMB down to the left of the key selection and drag to the right or left.
Right clicking while in the Track View gives you access to a contextual menu. In this menu there are tools that allow you to cut, copy, paste and delete keyframes and also scale and shift keyframes by specific amounts. There are also options for setting the slope of keyframes.
Clicking the MMB in the Track View will create a new keyframe at that position on the timeline for all selected channels or Items.
If you open the Graph editor you will see that it now includes a new track at the bottom that allows you to select and edit keyframes in the same way as you do in the Track View. Right clicking on this track will bring up the same context menu as in the Trackview.

