
There are two methods for animating hierarchies of elements (such as a character) - forward kinematics (FK) and inverse kinematics (IK). With forward kinematics, one starts animating by positioning the root element and then adjusting all the element down the chain. For example say you wanted a characters arm to reach for an object on a table. With FK, you would first position the shoulder joint, then the elbow and finally the wrist. If lucky, it would only take a few attempts to get the hand properly positioned to the object. IK works in reverse and is far more intuitive, simply grab the hand and bring to the object and the wrist, the elbow and shoulder joints adjust automatically, maintaining their proper orientation toward the goal, in this case, the hand.
modo has implemented an IK system that is fairly automatic and extremely robust. modo's Full Body IK is an automatic IK system that will work in a wide variety of rigging situations. While it is commonly used for characters, it can be applied to any hierarchy chain of locator based items. The setup of the chains is done easily by simply selecting the target elements and applying the commands found in the toolbox of the 'Setup' and 'Animate' interface tabs under the 'Inverse Kinematics' subtab.
![]()
The first step in using IK in modo is to assign it to the items that you want it to work with, this needs to be done in 'Setup' mode as this will define the rest positions for each joint. This can be done to a hierarchy of items, or to a full Skeleton, and can be applied either before or after the binding process. There are two methods of doing this, either to an entire hierarchy of items or to specific sections of a hierarchy. To assign IK to an entire hierarchy select the Root item of the chain and LMB+click click on the 'Assign IK' button. All items in the hierarchy from the root outward will have IK assigned to them.
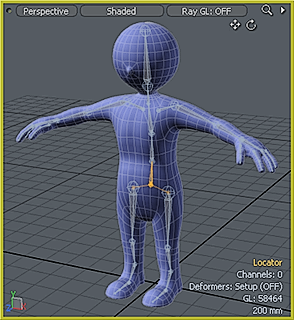 Select the 'Root' element of the hierarchy |
 'Apply IK' applies IK to the entire chain |
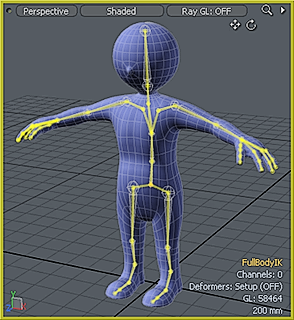
To assign IK to just specific parts of a hierarchy, select the Root item first, and then select the additional item(s) where the IK will be terminated and again LMB+click on the 'Assign IK' button.
 Select the 'Root' and 'Terminating' elements |
 IK is applied between the selected elements |
After IK has been assigned in this way, modo retains the selection of the terminating elements, users can simply add goal items by LMB+clicking on the 'Add Goal' button. Now when the Goals are transformed, the chain will adjust its potions and rotations toward the goal. You can then exit 'Setup' and begin to position the chain.
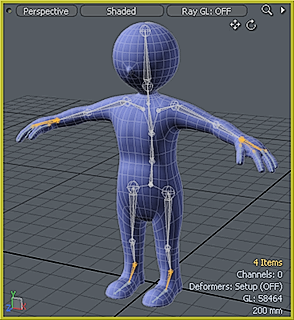 The terminating elements remain selected |
 The 'Add Goal' command adds goals to each |
All the items in the chain must be part of the same hierarchy, and all items must be 3D locator type items (such as joints created by the Skeleton tool, Locators or Mesh items). If any other type of item is encountered in the hierarchy, or another IK chain is present, the IK will terminate at that item. Any hierarchies that contain scaled items will need to have their scale frozen before assigning the IK. With the IK defined, an IK solver is created and parented to the Root item, called "FullBodyIK". This item contains the settings that control the overall behavior of the chain which can be found in Item Properties when selected (Documented on the 'Full Body IK' page).
With the IK chains defined, the target elements will still be controlled directly via FK (forward kinematics); users will still be able to individually transform each item in the chain. The IK is activated by the addition of 'Goals' and 'Tasks'. A goal is a general term used for items that drive IK chains, manipulating a goal item causes the rotations of items in the IK chain to change so the position and\or rotation of the end item matches that of the goal item. Goal items can be added to any item belonging to an IK chain apart from the chain Root and can have multiple goals, the IK solver will try to find the best solution to satisfy all the goals.
![]()
The simplest method of adding a goal is to select the item in the IK chain that represents the part of the chain that should move toward the goal, such is in an arm, this would be the hand/wrist joint (giving the user FK control over the fingers). Next, LMB+click on the 'Add Goal' button in the IK toolbar. This creates a small cube item (as a locator shape) at the position and orientation of the selected chain item, and adds position and orientation tasks to the selected joint, properly connecting them together with Channel Links. The cube is also given an initial custom color to help identify it, green for the positive side and red for the negative side.
If you have an existing item that you wish to use as a goal then you can use the 'Assign Goal' commands to attach it to a chain. Select the target chain item and the item to be used as a goal (in any order) and choose one of the 'Assign Goal' commands from the tool choice menu on the IK toolbar (RMB+click on the 'Assign Goal' button for additional options). These allow an item to be assigned as a 'Position Goal', an 'Orientation Goal' or both.
![]()
Removing a goal item is achieved by deleting the goal item and then selecting the chain item that the goal was connected to and removing the 'Tasks' via the buttons in the IK toolbar.
Tasks
IK assigned to a chain only comes into effect when "Tasks" are added to one or more items in the chain. Tasks are related to Goals, as they are the instructions to the joint to retain a Position, Rotation or Both. For a 'Position Task' the IK solver will attempt to keep the chain item at the world location the item had when the task was added. For a 'Rotation Task' the IK solver will attempt to keep the chain item at the same world orientation that it had when the task was added. 'Tasks' are implemented as groups of channels added to the joint. Each task has a set of FK channels and a Matrix channel. These channels are used to set the task transforms (in world space), so they can be driven by Modifiers, Channel links or other means. Multiple items in a chain can also have tasks added to them, the IK solver will try to find the best solution to satisfy all the tasks on the chain. Settings for each task on a chain item can be found in the Item Properties form.
![]()
To assign a 'Position Task', simply select the target Joint(s), and LMB+click on the 'Add Positions Task' button. This will add additional Position Task options to the Joints attributes, found in the Properties panel with the Joint is selected.
![]()
To assign an 'Orientation Task', simply select the target Joint(s), and LMB+click on the 'Add Orientation Task' button. This will add additional Orientation Task options to the Joints attributes, found in the Properties panel with the Joint is selected.
Adjusting the Chain
There will be times when the chain items need to be adjusted, such as repositioning a knee or elbow joint for example. When this happens, IK on the chain needs to be disabled before the chain items can be freely edited by the transform tools. Currently this is achieved by turning off the 'Enable' checkbox in each of the chain tasks. Once the chain items have been adjusted IK can be turned back on by re-enabling the chain tasks. Remember to update the location and\or orientation of any goal items that are driving the tasks beforehand. This can be applied easily by using the 'Match Position' and\or 'Match Rotation' commands in the Setup tab of the toolbar. If tasks are not driven by goals the chain will update itself to match the values of the task channels, these may need to be edited manually depending on your setup.
![]()
IK can be removed easily from the hierarchy by selecting the 'FullBodyIK' item and then pressing the 'Remove IK' button in the Inverse Kinematics toolbox. This removes the IK settings from each individual item, and deletes the 'FullBodyIK' solver item from the scene.

