
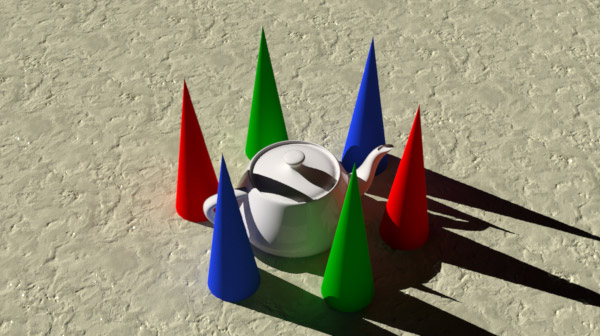
The Directional Light is most similar to the Sun. This light type emits a wall of parallel rays in the direction that the light is facing. The position of a Directional light is mostly irrelevant as the rays travel infinitely along their path through the scene, as such, only the Rotation is used to set the direction of the light's rays. Also, as a result of the infinite nature of the rays there is no falloff for a Directional Light.
As with all Items, the Directional Light controls are located on the Properties tab when the light is selected. Directional lights have Position and Rotation options as well as controls for the intensity of the light, shadow type, and other settings covered fully below. To control the lights color, shadow color and other material related properties, refer to the Light Material page of the documentation.
Directional Light
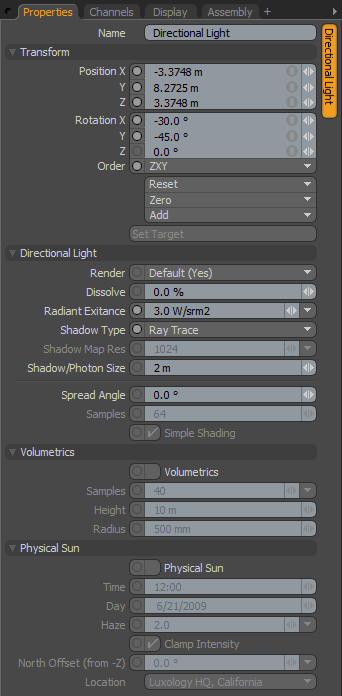 Name: This data field displays the current item name. Users may easily change it by LMB-clicking within the field and typing the new name.
Transform--
Position: An Item transform that allows the user to numerically position the light item in XYZ space. By default, Position transforms originates from the items center position.
Rotation: An Item transform that allows the user to numerically set the rotation of the light item. By default, Rotation transforms originates from items center position.
Order: Allows the user to set the order that rotations are applied to the light item. Changing the order that rotations are applied can sometimes help to reduce or eliminate gimbal lock.
Reset: Resets the selected transform values to (0,0,0) returning the items back to the world space center position.
Zero: Returns the light items Center position to the world space center (0,0,0) without changing the position of the light item itself.
Add: The 'Add' function will add the selected set of transforms to the channel list. Useful when animating complex motions, providing a layered approach to the transforms.
Set Target: By selecting the Light item, and a single additional item in the item list, and then pressing 'Set Target', this function allows users the ability to target specific items in a scene, automating the rotation of an item, so that it continuously points toward the targeted item. Once activated, additional option appear--
Remove Target: Removes the target link between the two items.
Enable: Toggling this option off temporarily disables the targeting function while retaining the link between the items.
Set Focus Distance: This option sets the focal distance for DOF when targeting camera items to other item.
Roll: Provides the ability to offset the items rotation angle away from the target.
Time Offset: Provides users the ability to time offset, by a number of frames, how the light follows the target item. It can either be delayed behind it with a negative value, or run ahead of it with a positive value.
Directional Light--
Render: This drop down menu allows the user to select from 3 choices, when set to 'Default', the user can enable/disable lights using the visibility function "![]() " of the item list. When the light is visible, it contributes to the final rendered scene and when invisible, it will not. On some instances the user may prefer to fix this state, setting the light as 'On' (enabled) or 'Off' (disabled) regardless of visibility. Also useful for workflows that auto toggle visibility, saving the user from manually enabling lights for test renders.
" of the item list. When the light is visible, it contributes to the final rendered scene and when invisible, it will not. On some instances the user may prefer to fix this state, setting the light as 'On' (enabled) or 'Off' (disabled) regardless of visibility. Also useful for workflows that auto toggle visibility, saving the user from manually enabling lights for test renders.
Dissolve: When the 'Dissolve' function is set to any value above 0%, the lights overall affect on the scene will attenuate as the value increases. When set to 100%, the lights effect on the scene is completely disabled. This function providing a convenient way to dim a lights effect within a scene.
Radiant Exitance: This value controls the intensity of the light and uses the standard physically based unit of Watts per volumetric meter. As you would expect, increasing this value will increase the amount of light coming from the Directional Light and decreasing the value reduces the light intensity. With directional lights, the area of light generated in the scene is very large and therefore small values are all that are necessary to illuminate an entire scene.
Shadow Type: This popup offers options between 'Ray Traced' , 'None' and 'Deep Shadow Maps'. In situations where users want a light to cast a shadow, Ray Traced will give the most accurate results. The traditional hard edge of ray traced shadows can easily be softened using 'Spread Angle' value in any light item. Deep Shadow maps are useful for volumetric lights and fur rendering, where a great deal of calculations are required to produce shadows; producing similar results to ray traced shadows while reducing the number of calculations.
Shadow Map Res: The 'Shadow Map Res' Sets the resolution for the calculated deep shadow map in pixels. This option is only available when Deep Shadow Map is selected.
Shadow/Photon Size: Since directional lights are infinite, 'Shadow Map Size' allows the user to specify the area that the shadow map will affect. Think of it like a rectangular panel aligned with the light items position in the 3D viewport (an outline appears around the light signifying the map size), shadow map 'rays' will fire from this panel forward and objects within this space will have shadows. As the shadow map size increase, you may find you need to increase the resolution to reduce blocky artifacts. When generating caustics with Directional Lights, adjustments to the 'Shadow/Photon' size also effect the photon emit area.
Spread Angle: The default value of 0° results in crisp hard-edged shadows. If you want to produce a more realistic soft-edged shadow users may increase this value. Since the Directional Light is most often used to simulate the Sun, a very small amount of Spread Angle is recommended. Values between 2 and 5 degrees will give a subtle soft edge to the shadow similar to sunlight. Keep in mind that increasing this value to high will result in noisy shadows unless the user also increases the number of samples.
|
|
|
|


Samples: As the Spread Angle increases, additional samples are required to smooth out the resulting soft edge shadow. If the shadow appears grainy, increasing this sample setting is the most likely solution. The default value of 16 is a good starting point for balancing speed and quality. As the spread increases or the resolution of the image increases you can drive this number higher to account for any grain that appears. Keep in mind that increasing the number of samples will also increase render times.
Simple Shading: When generating soft shadows with a spread angle greater than 0°, modo calculates the shadow as if sampled from an array of lights, these samples are blended together to produce the smooth result. With the 'Simple Shading' checkbox enabled, modo will calculate the specular and diffuse values for a surface as if the light were a single point, regardless of the spread angle. However, with 'Simple Shading' disabled, modo uses the same light array as the shadow to calculate the specular and diffuse values. This results in diffuse and specular shading that is 'soft', like the shadow but can also become increasingly grainy with a greater 'Spread Angle'. Increasing the number of 'Samples' will reduce grain in the diffuse and specular shading as well as the shadows at the expense of longer render times.
Volumetrics--
When light shines on particular matter suspended in the air, such as water vapor, smoke or even pollution, the light rays become visible. In computer graphics this effect is known as volumetric lights, their affect can be subtle or pronounced, either way it can add a good amount of believability and atmosphere to renders. Additional Settings related to volumetrics can be found in the Light Material item.
Volumetrics Checkbox: The 'Volumetrics' checkbox toggles the effect on or off. When enabled, the samples, height, and radius options become available.
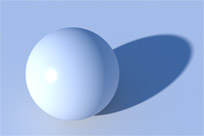
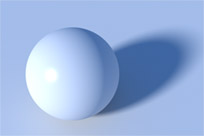
Samples: Any objects that intersect the light beam volume will cast shadows through it. You may have witnessed this when sunlight shining through the clouds creates streaks of light sometimes referred to as 'god rays'. The 'Sample' setting defines the degree of accuracy that modo uses to calculate these shadows through the volume, higher numbers of samples will give smoother and more accurate results, while lower values will render more quickly but become increasingly grainy. The sample below demonstrates the difference between 32 samples on the left and 256 samples on the right.
 |
 |
Height: This is the depth of the volume as measured extending out from the front of the light. A setting of 20m will extend the rays 20m from the light including falloff.
Radius: The 'Radius' sets the circular region around the light where volume effect will originate from.
The Physical Sun function works in tandem with the 'Physically-based Daylight' setting under the Environment Material properties. It is in that dialog box you enable the Daylight lighting function and select which light will act as the sun. Here in the directional light properties, you can activate that light as the sun and use the time and day values to set the suns position.
Physical Sun Checkbox: This setting toggles the directional light as the sun in the scene. You'll want to enable this for Physically-based Daylight renders.
Time: This sets the time of day for your lighting, and effect the position of the sun as well as the colors in the atmosphere -- afternoons offer cooler lighting and shorter shadows and evening times tend toward warmer oranges and reds and longer shadows.
Day: The sun rises and sets at different times during the year, based on the date supplied, this setting will position the sun precisely in your sky based on the location specified below.
Haze: In the real world, as the sun nears the horizon, light has to pass through a greater amount of atmosphere to reach our eyes, additionally, moisture, dust and pollutants in the air (collectively described as Haze) further affect the light. The further the light has to pass through these particles, the more shorter wavelengths of light are scattered. The longer wavelengths pass through tending the light toward warmer hues. Increasing the 'Haze' setting in modo will push the horizon colors toward oranges and yellows for midday lighting scenarios and deeper reads (sunsets) in evening times. This is the same setting as in the Physically-based Daylight properties.
Clamp Intensity: The Physically-based daylight function is a highly accurate lighting simulation generating light intensities outside of normal render display settings. The 'Clamp Intensity' toggle will limit the overall brightness of the sun producing pleasing results more easily. When disabled, you might think your scene is completely 'blown out' and overexposed, but actually, since modo renders in full floating point accuracy, you can bring back all that detail using a combination of white level, gamma and tone mapping. Please reference the Tone Mapping page of the documentation for more information.
North Offset: You've probably modeled your scene relative to the XYZ planes in modo and didn't take into consideration whether it was facing north or south. That's ok, you can use the 'North Offset' to make it face the proper direction without having to resort to item rotations. Your model can stay in its comfortable XYZ position and the world will revolve around it.
Location: The sun will appear in different positions in the sky from different locations on earth. The 'Location' setting allows the user to set the location for their scene so the Sun will appear in the proper position for your simulated sky. A number of well known locations is provided, but you can also specify the latitude and longitude positions for your custom location as well as save it in the config file for future use.

