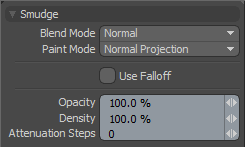
The Smudge tool shift pixels from under the brush in the direction of the mouse or stylus' movement creating the visual effect of smearing the paint together. Users can select the tool from the 'Paint' interface tab under the 'Paint Tools' subtab of the toolbox. The 'Smudge' tool can also be activated from the the menu bar option under the "Texture > Paint Tools" menu. When selected, the tool will also auto-select a Tip allowing users to begin painting directly into the active image map, defined by the image in the shader tree with the small paintbrush icon next to it (![]() ). Simply select a different target layer if you wish to paint onto a different layer. Users may also select different Tips and additionally add Ink and Nozzle effects to the paintbrush to further customize the way the brush applies to the surface. When selected, the associated attributes display in the Properties panel.
). Simply select a different target layer if you wish to paint onto a different layer. Users may also select different Tips and additionally add Ink and Nozzle effects to the paintbrush to further customize the way the brush applies to the surface. When selected, the associated attributes display in the Properties panel.
Smudge--
 Blend Mode: The Blend Mode defines how the strokes will blend into the existing canvas. The default 'Normal' setting will apply opaque strokes (as defined by the Opacity option) over the top of the existing canvas. The alternate options will work in the same respect as the layer blending options documented with examples on the Blend Modes page of the documentation.
Paint Mode: The Paint mode defines exactly how the strokes are applied to the canvas, providing users two different options-
Fast UV-- The 'Fast UV' mode is like virtually painting onto the flat image, while brushing over the 3D surface keeping the strokes thickness consistent with the canvas.
Normal Projection-- The 'Normal Projection' mode is like painting on a virtual plane of glass over the viewport, and the stroke is projected onto the surface when it is released, creating a stroke thickness that is consistent with the viewport. While it will occasionally produce odd stroke results at glancing angles, the Normal Projection method doesn't suffer from the limitations of painting across seams and borders like as the Fast UV method does and is generally the preferred method.
Use Falloff: The 'Use Falloff' option will allow any of the various falloffs to mask the application of fill effect.
Opacity: This value determines how the total opacity of the ink distributed by the brush. If the value is less than 100% the ink will max out at that percentage and never become fully opaque no matter how many times you paint over the stroke.
Density: This value determines the amount of ink that comes out during a paint stroke. Unlike Opacity, when Density is below 100% painting over the existing stroke repeatedly will continue to increase the amount of paint on the map.
Attenuation Steps: This value will cause the paint to "fade out" after the set number of steps is reached in the stroke. This setting is somewhat related to the speed with which you create the stroke as painting quickly will spread out the "steps" used to paint the stroke. Moving the brush slowly with this value set above 0 will cause the paint to run out in a shorter stroke. This is a very useful setting to use if you do not have a tablet to paint with. Tablet users would be better suited to modulate the paint opacity based on the tablet pressure so as to have greater control.


