
Introduction
A particle, individually, is really just a single vertex, a position in 3D space. But unlike a vertex, users don't create or move particles directly. For simulations sake a 'particle' is indirectly given motion by the application of virtual forces acting upon it, and this is where the simulation part comes in. Forces are evaluated, per frame, producing a motion that is a simulation of how an element might react in the real world when placed under similar influence. The most common 'Force' acting on a given particle is 'Gravity', which compels it downward, another is 'Wind', compelling it forward. Combinations of multiple forces can be applied, and simulated to produce a more dynamic result.
Now animating a single element in this way doesn't offer much of a compelling benefit; the true strength of a Particle System lies in collections of many, many particles reacting in concert, all moving in relation to one another and reacting to other elements within a given scene. These collection of particles can be used to easily simulate simple phenomena like water dripping from a faucet, to something much more complex like fireworks, or dust kicking up from a spinning wheel.
The MODO particle simulation system uses the same global evaluation engine as it does for dynamics, therefore a lot of the same workflows can be applied to both setups. Due to their deep integration inside MODO, they can also work together, with particle elements affecting dynamic items and dynamic items affecting particle elements. This overview page focuses on Particles specifically, for more information on working with Dynamics, please reference the Dynamics Overview page of the documentation.
Simulation Basics
While users don't directly control individual particles, they can directly specify where (and how) the particles are generated using what is called an 'Emitter'. Emitters are the first element in the simulation chain, they generate the particles. Once a particle is born, it is instantly acted upon by 'Forces', the next element in the chain. Forces largely control the motion of the particles. The third element in the chain is optional but can be a very powerful addition; 'Modifiers' can be assigned providing additional specific functionality, such as evaluating inter-particle interactions, or adding 'Collisions' allowing particles to interact and collide with Dynamic elements. The combination of all these various elements is collectively called a Particle System, also often referred to simply as a Particle Simulation.
MODO provides a robust and flexible node based Particle System, where each element (called a 'node') is connected in an evaluation chain that is used to calculate the final result. These node setups (called 'Graphs') are created and modified in the Schematic viewport. For most simple setups though, the connections of particle nodes and modifiers are all done automatically in the background when creating items using the commands found in the Particles toolbox (a subtab of the 'Setup' workspace toolbox). At any time users can drag and drop the simulation elements from the Items list into the Schematic viewport to see how they are connected, and from there continue building the graph network to create additional complexity.
Viewing of the Particles is done directly in the 3D viewport using the simulation transport buttons (covered further below). Pressing either of these buttons puts the particles in motion using the current settings. Users can modify those settings and get real-time feedback of the changes, allowing users to easily see how different settings will affect the outcome. Once a desired look is achieved, the particles can then be 'cached' for final rendering as particles are not renderable until this step. Caching them essentially sets the particles into their current state that remains a part of the saved scene (kind of like baking animation frames). The actual rendering of the simulated particles is done by assigning an effect of some sort that renders in place of the particle positions. This can be 'Blobs', 'Volumes' or 'Sprites', each having their own unique look and controls. Additionally users can assign any geometry element to particles using Replicators.
Workflow
Starting a new simulation only requires the creation of an Emitter. This can be done using the particle creation tools found in the 'Setup' interface layout and navigating to the 'Particles' subtab. The most common Emitter type is the 'Radial' emitter, a very flexible emitter that can be used in a variety of situations. LMB+clicking the toolbox button of the same name creates an emitter in the scene and also additionally adds a 'Simulation' item to the Items list. These two elements work together to produce a basic particle simulation. The emitter item generates the actual particles based on its attributes, such as the number of particles and their initial speed at birth. The Simulation item adds the universal ' Gravity' force that governs the particles motion after birth. It also has settings that define the resolution of the simulation and will hold the final cached particle data for rendering.
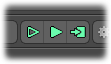
Realtime preview in the 3D viewport is handled by the simulation transport controls found below the main 3D viewport. The two left buttons (seen above) provide continuous, real-time simulation directly in the 3D viewports. This allows users to adjust settings and move objects and see the changes happen live, directly in the 3D viewport. The 'Preview at Current Time' button (hollow arrow) specifically plays the simulation at the current timeline position ignoring keyframed animation, the 'Preview Animation' button (solid arrow) cycles through playing the timeline with all keyframed animations. When either button is pressed, the buttons themselves will change to 'Stop' buttons which can then be pressed to stop the simulation playback. Unless the particles are meant to interact with Dynamic items or their is animated channels on the particle items, the first (left) button will be most often used.
With the 'Simulation Run' button pressed, users will see the particles moving in the 3D viewport. By selecting the Emitter item in the Items list, users can adjust its attributes in the 'Properties' viewport panel and see in real-time how the new settings affect the generation of the particles. Adjusting the number of particles or their initial velocity will show up instantly in the viewport. Users can also adjust the emitter shape by controlling the 'Cone Angle' and 'Angle Spread' values. The emitter can by further modified by transforming the emitter itself, changing its angle and position using the standard transform tools while in Items mode.
Once the desired settings are defined, users will cache the simulation to the Simulation item. This is done by the third transport button, 'Compute Simulation' (the arrow pointing to the box). Pressing it opens the following dialog--
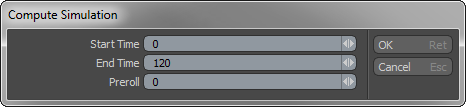
By default it will reflect the Scene length values for the Start and End times. Users can adjust these in cases where it is desired to have a simulation run longer or shorter than the scene itself. The 'Start Time' indicates where the simulation will begin to be evaluated. Particles will not start to emit until this frame, and the 'End Time' designates the end of the simulation evaluation. The 'Preroll' value allows the particle to be emitted and active prior to the 'Start Time' but the values will not be cached until that defined frame. This is useful in cases where particles should already exist at the beginning of a sequence. Take for instance fog in a scene, the Preroll option allows the fog to be visible and moving in the scene at the start frame, otherwise the fog would have to 'roll-in' and build up in the scene first, which might not be the desired result.
While particles are visible as points in the 3D viewports, by themselves they won't directly render. In order to actually see particles in a render, users will need to assign them as point sources to an appropriate effect, such as 'Replicators' , 'Blobs', 'Volumes' and 'Sprites'. The effect chosen will depend greatly on the desired result. 'Replicators' can be used to assign geometry to the particles for effects like bullets firing and shell casings flying. 'Blobs' can be applied to particles with 'Dynamic Fluids' for liquid type effects. Fire and smoke are perfect candidates for 'Volumes', especially when combined with 'Shader Tree' textures controlling their color and density. 'Sprites' are useful for image based particles effects, such as falling ashes after an explosion. Each different effect has a 'Particle Source' option where the 'Particle Simulation' item can be designated. Remember that the simulation must be cached using the appropriate simulation control for the render to actually see the particle.

