Once any particle in generated by an Emitter, Particles motion is governed by Forces. By default this is Gravity provided by the 'Particle Simulation' item. While Forces (and Falloffs) can produce interesting effects, it is the Particle Operators that give users broad control over Particles in motion, providing effects for Age, Speed, Collision and a multitude of other controllers. Flocking controls how particles move relative to its neighbors, Dynamic Fluid will allow particles to cling closely together simulating viscous fluids, while Terminators can cause particles to die within the bounds of a Falloff. Really, operators can be seen as part of the building blocks that can be added to an overall simulation to provide a huge number of possibilities. Select from any of the operators below to see the documentation related to the item-
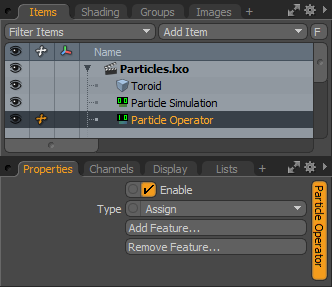
The 'Particle Operator' is a general filter/modifier type item that can be used to process and/or modify all particles in a simulation based on user selected 'Features'. Its use of the schematic view to nodally connect and alter any features makes it very powerful and extremely flexible. In a way its use can be thought of like adding 'User Channels', as adding 'Features' creates additional channels on the Operator that can be linked to produce a specific result.
Usage
The main Particle controls are found in the 'Particles' subtab of the 'Setup' interface's toolbox. Usage of the 'Particle Operator' obviously requires a 'Particle Simulation' on which to operate. With a Particle Simulation selected in the Items list, pressing the 'Particle Operator button in the toolbox adds the items. Also the 'Add Item' button can be used to insert the operator under "Particles > Simulation > Particle Operator". Once created, using the 'Add Feature' button found in the Properties panel when the item is selected in the 'Items' list will open a popup dialog that allows the user to select the feature and additionally add the Feature channel to the operator in the Schematic view, if it is already present there. Users can add as many features are necessary for the intended result. Since the Particle Operator is such an open ended controller, it is largely up to the user how it gets used based on the Feature assignment. The following video demonstrates one use of the Operator-
Enable: The 'Enable' option toggles the Particle Operator item on or off. When enabled the settings of the Operator will be evaluated for the associated particle simulation, when disabled the settings will be ignored.
Type: The 'Type' option determines how the Feature results integrate with the original particle data values, there are several possible options- Assign- The 'Assign' option outputs the values of the Operator directly to particle features for every step. Integrate- The 'Integrate' option adds the outputs to particle features, effectively making them the rate of change. New- The 'New' option outputs are assigned only to new particles, allowing them to be initialized. Trigger- The 'Trigger' option outputs are assigned only when the trigger channel is true.
Add/Remove Feature: Using the Add and Remove options allows users to create only the pertinent controls based on the desired results. Each feature represents a specific aspect of an individual particle in a simulation. Each Feature type also has two options, the regular feature and a Read-Only version which differs in that it contains no input connection. These types of Features will reduce evaluation overhead which can be important in complex simulations. Note that is may be necessary to enable the storing of certain features in the Simulation item, as not all calculated by default.
Collector/Emitter
The Collector/Emitter Item works as a co-processor to a 'Particle Operator' item. When the signal channel on the collector is true, features of the current particle are collected. This serves as a set of new particles that will be emitted into a second simulation. Basically it takes particles from one simulation and moves them to another simulation. What features are collected are dependent on the channels and their links to and from the 'Particle Operator' and the 'Collector/Emitter'. This is useful if, for instance, one wanted to change the items from one Replicator into the items of another separate Replicator based on a specified event.
Usage
The main Particle controls are found in the 'Particles' subtab of the 'Setup' interface's toolbox. Usage of the 'Collector/Emitter' obviously requires a 'Particle Simulation' on which to operate with 'Particle Operator'. With the Particle Simulation item selected in the Items list, pressing the 'Collector/Emitter' button in the toolbox adds the item. Also the 'Add Item' button can be used to insert the operator under "Particles > Simulation > Collector/Emitter". Once created, using the 'Add Feature' button found in the Properties panel when the item is selected in the 'Items' list will open a popup dialog that allows the user to select the feature and additionally add the Feature channel to the operator in the Schematic view, if it is already present there. Users can add as many features are necessary for the intended result. Since the Collector/Emitter is such an open ended controller, it is largely up to the user how it gets used based on the Feature assignment and Schematic connections.
Name: This data field displays the current items name. Users may easily change it by LMB-clicking within the field and typing the new name.
Collector / Emitter--
Add Feature: The 'Add Feature' function allow users to define custom channels (Features) for the item that can then be used to drive other channels. Pressing the 'Add Feature' button opens the Feature dialogue where users can select from the available 'Features' specific to particles and add them to the 'Collector Emitter' when pressing 'OK'. Additionally, there is an option to automatically add the the selected feature as a channel to the 'Collector/Emitter' to the Schematic view if it is already present.
Remove Feature: The 'Remove Feature' allows users to delete unnecessary feature channels that have been added to the 'Collector/Emitter'.
Flocking
Flocking is a particle operator that creates forces between particles that produce distinct particles groups or clumps. Users have control of how strong the bond between these groups are as well as how quickly they appear in a simulation.
Usage
The main Particle controls are found in the 'Particles' subtab of the 'Setup' interface's toolbox. Usage of the 'Flocking' operator requires a 'Particle Simulation' on which to operate. With the Particle Simulation item selected in the Items list, pressing the 'Flocking' button in the toolbox adds the item. Also the 'Add Item' button can be used to insert the operator under "Particles > Simulation > Flocking". When added this way, the Flocking operator will connect to the Operator input of the Particle Simulation item and affect all emitted particles. When the Flocking item is selected, the following attributes appear in the 'Properties' panel-
Name: This data field displays the current items name. Users may easily change it by LMB-clicking within the field and typing the new name.
Flocking--
Enable: The 'Enable' option toggles the Flocking Operator item on or off. When enabled the settings of the Operator will be evaluated for the associated particle simulation, when disabled the settings will be ignored.
Strength: The 'Strength' setting controls how much influence the Flocking force has upon the target particles. Higher values will tend the particle to flock sooner in a simulation while lower values will tend particles to flock later.
Neighbors: The 'Neighbors' option controls the number of particles around a single particle that it will consider when deciding which Flocking group to join. Keep in mind that since this value is per particle, increasing the Neighbor value too high can quickly cause a simulation to slow to a crawl.
Minimum Distance: The 'Minimum Distance' value determines the distance where grouped particles will repel away from each other.
Maximum Distance: The 'Maximum Distance' value determines the radius distance that a particle uses to look for neighbors to join with.
Cohesion: The 'Cohesion' option controls the strength of the influence that causes particles to move toward the averaged position of its neighbors. It is essentially the strength of the bond that keeps the group together.
Alignment: The 'Alignment option controls the strength of the influence that causes particles to orient toward the averaged direction of its neighbors. It is essentially keeping the particles moving in the same direction.
Separation: The 'Separation' option controls the strength of avoidance from crowding between neighbors in a group; the repulsion of nearby particles.
Dynamic Collider
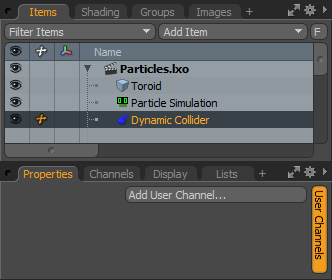
The 'Dynamic Collider' has no user adjustable attributes in the Properties panel, it is merely meant as a bridge to share data between a particle simulation and a soft or hard-body dynamics simulation when calculating collisions between them. This allows users to control which simulations are necessary to share data, which can save valuable calculation time for complex simulations of all types.
Usage
The main Particle controls are found in the 'Particles' subtab of the 'Setup' interface's toolbox. Before adding the 'Dynamic Collider' it will be necessary to have the Dynamic and Particle simulation items already present. By first selecting the dynamics 'Solver' item and the 'Particle Simulation' item, creating the 'Dynamics Collider' item will connect them as necessary for proper evaluation. Once the items are selected, pressing the 'Dynamic Collider' button in the toolbox will add the item to the scene. Users can also add the item via the 'Add Items' button of the 'Items List'- "Particles > Simulation > Dynamic Collider".
Users may also wish to manually connect the 'Dynamic Collider' elements together via the Schematic viewport (illustrated below). For information of working with elements in the Schematic viewport, please reference that page of the documentation. For more information on using the particle simulation tools, please reference the Particles and Simulation Overview page of the documentation.
The 'Dynamic Collider' item connects to the 'Solver' and the 'Particle Simulation' items.
Dynamic Collider--
There are no user definable attributes or channels related to the 'Dynamic Collider'.
Dynamic Fluid
The 'Dynamic Fluid' item allows users to simulate a variety of viscous liquids. The item itself is attached to a 'Particle Simulation' item and works to control the particles so that they act in a fluid manner. Fluids are fully integrated into the dynamics of MODO and can be used to affect Solid Body elements as well when combined with a 'Dynamic Collider' item connecting the two simulations. 'Forces' can also be added to the simulation providing additional control over the resulting particle behaviors.
Usage
The main Particle controls are found in the 'Particles' subtab of the 'Setup' interface's toolbox. The Dynamic Fluid item is added to an existing particle simulation, which at minimum requires an 'Emitter' and a 'Particle Simulator'. Selecting the target 'Particle Simulation' item and adding the 'Dynamic Fluid' item using the toolbox button will automatically wire up the connection between the items. Note that for proper results users must use an emitter with some volume to the emission area. By default MODO emitters are single point, which is infinitely small. The fluid simulation produces particles that, like a liquid, are incompressible and when multiples are spawned from the single point, forces are generated that make the particles appear to shoot off in random directions. When using the 'Radial' and 'Curve' emitters it is necessary to define a 'Start Radius' that is larger than the 'Radius' value of the 'Dynamic Fluid' Item for proper results. Once the item is added to the simulation, particles will act in a fluid manner. When the 'Dynamic Fluid' item is selected, the following attributes are available-
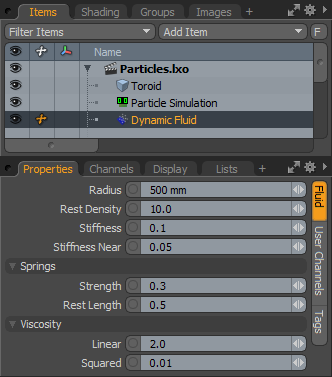
Radius: Density in the resulting fluid volume is determined by neighboring particles connecting via virtual springs. To save simulation time, springs are only generated for nearby particles in the simulation. The 'Radius' option defines the area around a particle where it will search for neighbors to connect with.
Rest Density: The 'Rest Density' option controls the maximum number of neighboring particles that can connect to a single particle when at rest (meaning they have reached a minimum velocity threshold).
Stiffness: The 'Stiffness' option controls the strength of the inter-particle springs in retaining the 'Radius' value. Higher values will create springier, bouncier particle, that are more apt to act like splashes, where lower values will result in softer springs that react more like a viscous fluid.
Stiffness Near: When the distance for resting particles becomes less than the 'Radius' value additional smaller springs are added between particles that control the resting movement of the fluid. This is the 'Stiffness Near' setting. It controls the repelling strength between resting particles.
Springs--
Strength: The 'Strength' value determines the flexing strength of the virtual springs generated between particles which results in the fluids Plasticity, which can be generally thought of as how quickly or slowly the substance forgets its former shape.
Rest Length: When particles are resting the spring length is modified to pull neighboring particles together to form the overall density volume. The 'Rest Length' determines that minimum spring length value.
Viscosity--
Linear: The Viscosity setting controls the
velocity transition values between active and resting particles. Higher 'Linear' values will increase the transition timer creating what appears like a thicker fluid.
Squared: When particles in a group reach equilibrium, non linear forces are applied that repels the neighboring particles to maintain density in the volume. The 'Squared' value defines the strength of that force.
Terminator
The 'Terminator' item is a filter that works in conjunction with a Falloff to generate specific areas where a particle will be destroyed or killed.
Usage
The main Particle controls are found in the 'Particles' subtab of the 'Setup' interface's toolbox. Usage of the 'Terminator' requires a 'Particle Simulation' on which to operate. With the Particle Simulation item selected in the Items list, pressing the 'Terminator' button in the toolbox adds the item. Also the 'Add Item' button can be used to insert the operator under "Particles > Simulation > Terminator". Once created, users will then need to also add a 'Falloff'. Falloffs are found at the bottom of the toolbox under the 'Add Falloff' button or in the Items list with the 'Add Item' button under 'Falloffs'. The type of Falloff selected is determined by the desired effect. Once all the items are created they need to be added by drag and drop to the Schematic viewport and connected appropriately demonstrated here with a basic particle simulation. For more information of working with the Schematic viewport, please reference that page of the documentation.
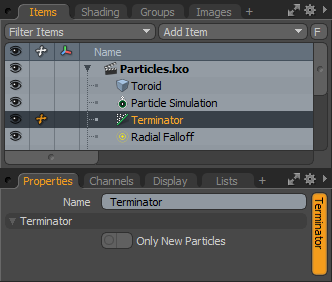
Name: This data field displays the current items name. Users may easily change it by LMB-clicking within the field and typing the new name.
Terminator--
Only New Particles: When this option is enable, only newly generated particles will be affected by the Terminator.


 Enable: The 'Enable' option toggles the Particle Operator item on or off. When enabled the settings of the Operator will be evaluated for the associated particle simulation, when disabled the settings will be ignored.
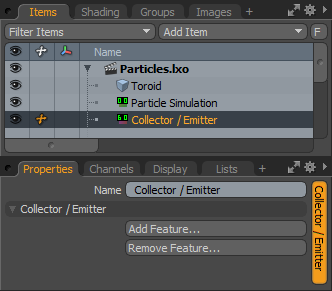 Name: This data field displays the current items name. Users may easily change it by LMB-clicking within the field and typing the new name.
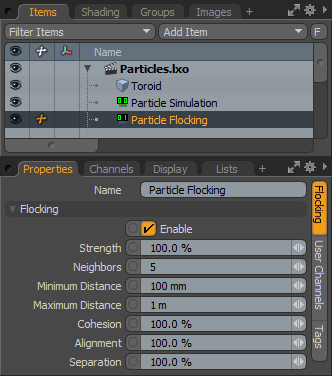 Name: This data field displays the current items name. Users may easily change it by LMB-clicking within the field and typing the new name.
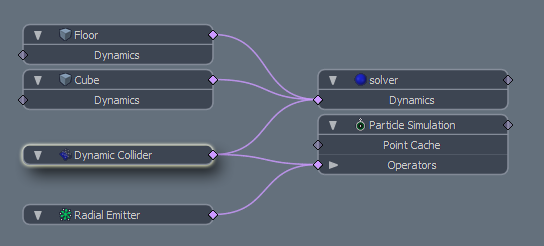
 Radius: Density in the resulting fluid volume is determined by neighboring particles connecting via virtual springs. To save simulation time, springs are only generated for nearby particles in the simulation. The 'Radius' option defines the area around a particle where it will search for neighbors to connect with.
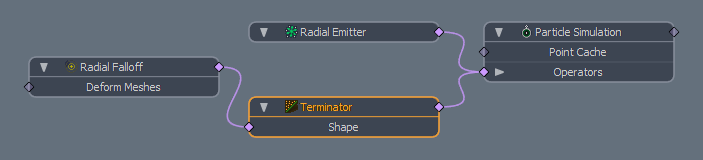
 Name: This data field displays the current items name. Users may easily change it by LMB-clicking within the field and typing the new name.