
Saving Images
Home >> Shade, Light & Render >> Saving Images
Saving Rendered Images
When rendering by way of the 'Bake' commands MODO obviously calculates the image, but once finished, the resulting image is in a limbo state within the Render Display window. It is cached to disk temporarily for you to preview; this is useful for the iterative process of adjusting the bake. However, the image itself is not truly saved (i.e. accessible to other applications) until the user specifically tells MODO to do so using any of the commands necessary for saving; the 'Save Image' and 'Save Layered Image' functions. Each time any 'Bake' command is invoked, MODO will calculate all render outputs. Once rendered they appear in the 'Output' list of the Render Display (highlighted below).

When using the 'Save Image' option, the currently selected (i.e. visible) render output will be saved. Pressing the 'Save Image' button found in the upper left of the browser area of the Render Display opens an operating system appropriate dialog window, allowing users to specify a location and filename for the image, and most importantly a format. MODO supports a wide variety of bitmap image formats, each with their own benefits and limitations. By itself, MODO support the following formats--
| Format Name | Extension | Bit Depth per channel |
Compressed | Type |
| Flexible Precision Image Format | .FLX | 32 bit | Yes | Lossless |
| Targa | .TGA | 8 bit + Alpha | No | |
| Windows BMP | .BMP | 8 bit + Alpha | No | |
| Radiance High Dynamic Range | .HDR | HDR | Yes | Lossless |
| JPEG 2000 | .JP2 | 8 bit | Yes | Lossy |
| JPEG 2000 16-bit | .JP2 | 16 bit | Yes | Lossy |
| JPEG 2000 16-bit Lossless | .JP2 | 16 bit | Yes | Lossless |
| JPEG | .JPG | 8 bit | Yes | Lossy |
| Portable Network Graphic | .PNG | 8 bit + Alpha | Yes | Lossless |
| Portable Network Graphic 16 bit | .PNG | 16 bit + Alpha | Yes | Lossless |
| PSD (Photoshop Document) | .PSD | 8 bit | No | |
| SGI RGB | .SGI | 8 bit | No | |
| Tagged Image File Format | .TIF | 8 bit + Alpha | Yes | Lossless |
| 16-Bit TIF | .TIF | 16 bit + Alpha | Yes | Lossless |
| 16-Bit Uncompressed TIF | .TIF | 16 bit + Alpha | No | |
| Open EXR | .EXR | HDR | Yes | Lossless |
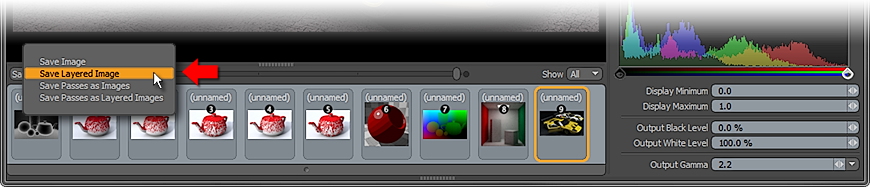
When using the 'Save Layered Image' option (found by a LMB+click and hold on the 'Save Image' button to open the pop-up menu), MODO will save all available Render Outputs simultaneously, when pressed an operating system appropriate dialog window opens allowing users to specify a location and filename for the image(s), and a format as well. The following options are available--
| Format Name | Extension | Bit Depth per channel |
Compressed | Type |
| Layered PSD | .PSD | 8 bit | No | |
| Multi-File PNG* | .PNG | 8 bit | Yes | Lossless |
| Multi-File PNG 16 bit* | .PNG | 16 bit | Yes | Lossless |
| Layered Open EXR | .EXR | HDR | Yes | Lossless |
| *Multi-File PNG saves all outputs with appropriate output name appended to each | ||||
Saving User Created Images
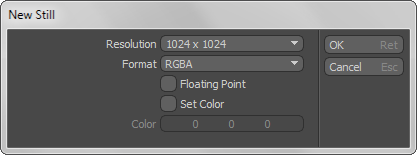
MODO offers users the ability to create bit-mapped images directly in MODO eliminating the need for an external image editing application. Within nearly every image loader and image browser viewport, users are offered options to create a 'New Image' or 'Image Sequence' (Alternatively, these commands are also available in the menu bar under the 'File' option). When utilizing either command, a operating system specific dialog will open prompting users to choose a filename, location and format. Once specified, another dialog opens allowing users to choose various options related to the image.
Once the user clicks 'OK' or presses 'Return', the image is saved to disc. It's important for users to understand that this file is not embedded into the MODO file itself, but acts like any other imported image remaining linked to the saved external file as specified. This newly created image is effectively a blank canvas for users to use for painting, sculpting and baking (or any combination thereof). The image appears within the images viewport and is immediately available as a texture layer for placement anywhere within the shader tree. However (!!!) any modification made to the image once created will not be saved unless the user specifically requests MODO to do so. Files can be saved several ways. First, by way of RMB-clicking the image in the image viewer palette, and choosing either the 'Save' or 'Save As' command. Secondly, by way of the menu bar commands 'File > Save Image' or 'File > Save Image As'. In the case of scenes with multiple images, the highlighted or selected image in the image viewer palette is the image saved when utilizing either command. Lastly, if any modifications have occurred to images present in MODO when exiting the application, users will be prompted if they wish to 'Save' the changes, overwriting the files previous saved state.

TIP: Users often ask which is the best format to save in. Unfortunately, there is no one correct answer as it is highly dependent on the intended use; particular workflows impose specific requirements. Visual effects work is enhanced by the additional information afforded by HDRI formats such as HDR and openEXR, but these formats also require the greatest amount of storage space. Advertising and visualization are often further edited in imaging applications such as Photoshop. The layered PSD format could be a good choice, but the 16 bit flavors of TIF and PNG can afford additional editing leeway with their extended bit depth. Any of the compressed formats will help reduce the amount of disc space necessary, especially when storing long image sequences, but lossy formats may also introduce compression artifacts that can reduce quality of the final deliverable. For best results, users should thoroughly test their chosen format to ensure they receive the intended outcome.