
Render Display
Home >> Shade, Light & Render >> Render Display
The 'Render Display' window provides users a variety of useful options and feedback for working with the resulting baked pixels for any MODO scene. The Render Display window opens automatically when invoking any of the Bake commands. Once open, the window provides a view of the baked texture(s), along with a number of useful statistics and comparison tools. The window is broken into three main areas that are all inter-related -Image Display, Control panels, and the Render Browser. Each section is documented below.

The main area is the actual image display itself. This does duty as both a final image display and provides useful visual feedback for the progression of the texture being baked. Directly above this window are the controls that determine what is actually displayed, such as a particular Render Output to display during rendering, and a zoom level control. Users may also zoom in the window directly using the 'Ctrl+Alt+LMB click and drag. Once zoomed in, use the LMB+click and drag to navigate across the image. Pressing 'Ctrl+A' will fit the entire image to the viewable area.
The Control panel is organized into two tabs, each with a dedicated function. Users can LMB+click on any of the tabs to view the associated attributes. Going left to right, the first tab is the 'Compare, Region Options' which provides tools for rendering limited regions and comparing subsequent and prior renders. The next tab is the 'Statistics' panel, which provides useful information regarding the texture during baking, such as memory usage, elapsed time and the final numbers of polygons; updated live throughout the render process.
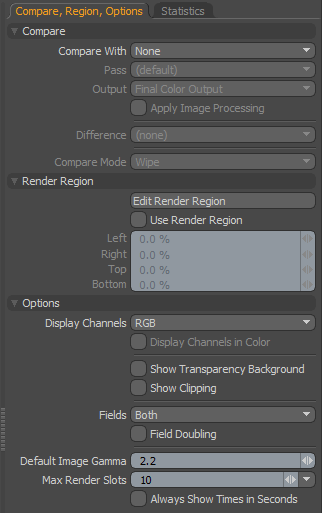
Compare, Region, Options
 Compare--
The Compare options provide users the ability to
examine two images in a variety of ways, making it easier to contrast any differences between them.
Compare with: The 'Compare with' option determines what opposing images are compared-
None- No image comparison
"B" Slot- Two separate images are compared, 'Slot A' is determined by the current image selected in the browser, 'Slot B' is determined by holding down the 'Ctrl' key and LMB+clicking on a second image slot in the browser. A small 'A' and 'B' icon will appear beneath each image signifying which is which.
"A" Slot Output- With this option, users can compare between associated 'Passes' or 'Render Outputs' of the same image.
Pass: When the '"A" Slot Output' option is selected, users can determine which particular 'Pass' output to compare against with this option.
Output: When the '"A" Slot Output' option is selected, users can determine which particular 'Render Output' to compare against with this option.
Apply Image Processing: The 'Apply Image Processing' toggle disables/enables the application of all the image adjustments options in the Render Display window.
Difference: The 'Difference' option calculates the pixel variance between the two images and displays it as a grayscale image. Black indicates no difference between the two pixels, attenuating toward white, which indicates the maximum difference. The amount of difference displayed can be scaled (using the 'Difference Scale' option, which is only visible when 'Difference' is activated) This is mostly for for high dynamic range images, but in some cases will provide better indication of dramatic or subtle differences. The difference calculation is simply the same math used to determine the difference between two numbers (subtracting one value from the other). Each of the available options displays the difference between the two images for the chosen aspect- such as the difference between the 'Hue' of both images, or the difference of the 'Saturation' amount. Utilizing the 'Difference' option can be especially helpful in pinpointing subtle differences between two similar images.
Compare Mode: Several modes define how the two images are compared, each with additional options-
Wipe- Two images are overlaid and the top image is wiped away revealing the lower image. Additional options allow users to select 'Horizontal' or 'Vertical' wiping directions and set a position percent, or choose the 'Dissolve' option and set an 'Opacity' amount.
Spotlight- The 'Spotlight' option reveals the "B" images as a circle around the mouse pointer (move the mouse over the image to see its results) . The size of the circle is determined by the 'Spotlight Radius' control.
Side by Side- The 'Side by Side' options displays two half width images that can be scrolled with an option to Stack the images vertically.
Render Region--
The 'Render Region' option allows users to selectively render a smaller segment of the entire image making the iterative process of creating a final rendered image faster and more fluid. For user's convenience, these settings duplicate the functionality of the Render items Render Region functionary.
Edit Render Region: When this option is enabled, users can drag directly over the rendered image to define the limited region area interactively. Subsequently, once the initial area is defined, edges and corners of the region will highlight allowing further refinement to the defined region. LMB+click and drag the highlighted border to adjust.
If edits are being made to the same scene, the area outside the defined region will be used as a background to successive renders until disabled. When switching between scenes or image resolutions, then the background area outside the region will simply render as black.
Use Render Region: The 'Use Render Region' option toggle will temporarily enable/disable the limited region functionality without losing any of the settings.
Left/Right/Top/Bottom: Left/Right and Top/Bottom percentage settings work in conjunction with each other to specify the total rendered region width and height.
Options--
Display Channels: All resulting rendered images are generated as standard RGB bitmap format images. For diagnostic purposes, it may be valuable for users to see the individual 'Red, 'Green' or 'Blue' color channels of an image.
Display Channels in Color: When this option is enabled, individual channels will display as colored versions of themselves. When disabled, individual channels will display as grayscale representations.
Show Transparency Background: When enabled, any loaded images that contain an alpha/transparency channel will display a grey checkerboard where the image is transparent mimicking a similar option found in many image editing applications. Note that this option doesn't apply to internally rendered alpha channels.
Show Clipping: When enabled, a diagonal black and white stripe pattern (called a Zebra pattern) will display over overexposed or blown out areas of the image providing useful feedback for adjusting image white point and tone mapping an image to compress as much dynamic range information as possible.
Fields: For scanline televisions (older tube televisions) there were originally two half frames that made up each whole frame, interlaced on top of each other to make a single image. Enabling the 'Field Rendering' option will properly render two discreet moments in time and interlace the resulting half-frames into a single image (in essence doubling the frame rate). The 'Fields' option allows users to independently display either the 'Upper' or 'Lower' field, or 'Both' which is the standard default for non-interlaced (progressive) frames.
Field Doubling: When viewing individual fields, enabling the 'Field Doubling' option will duplicate every other line eliminating the black screen lines from the display.
Default Image Gamma: When loading non-HDR image formats into the Image Browser, this is the default gamma value applied to the imported image. For more information on gamma, please reference the Render Output page of the documentation.
Max Render Slots: This value determines the maximum number of frame buffers (renders) saved on disc in the Image Browser. Once this value is exceeded, the oldest render will be deleted, unless locked. If all frames are locked, then they will be treated as if all unlocked once the maximum number is met. This option is not affected by images loaded into the Browser.
Always Show Time in Seconds: Displays time in total seconds instead of HH:MM:SS, example- 01:12:37 would be displayed as 4357 seconds.
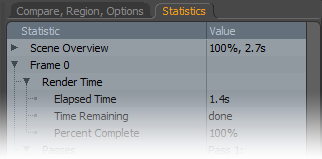 The Statistics panel provides a huge amount of statistical information related to rendering the scene. Included in this information is the elapsed time as well as an approximate remaining time for in-progress frames. For finished frames, the total rendering calculation time is displayed, along with total memory usage, total number of polygons generated. The information is cleanly organized and largely self explanatory. Navigation of the list works the same as other viewports. Users can open or close a specific section by LMB+clicking the preceding arrow (
 ![]() ). Holding shift and clicking an arrow will open/close all sub-sections of the clicked on topic, making it easy to view all the information related to a single frame.
). Holding shift and clicking an arrow will open/close all sub-sections of the clicked on topic, making it easy to view all the information related to a single frame.

The Render Browser allows for an unlimited number of rendered frames (well, it is limited by the amount of hard drive space available). The browser itself serves a couple of purposes, foremost being that users can select the current image to be displayed in the display area by LMB+clicking on any of the icons. The current image selection is designated by the orange outline of the icon; only the current image can be modified using the image adjustment controls. The render order of images is also displayed using the small number icons above each image. When the mouse hovers over an icon, two additional controls appear, an 'X' that if clicked will remove the image from the browser (deleting it from disc) and a small lock icon users can click to lock items from being deleted accidentally. Simply click the lock icon again to unlock. Users can select multiple images by holding down the Ctrl' key as well allowing for gang removal/locking/unlocking of multiple images.
The Render Browser is also used to Load and Save images. When images are rendered, their existence in the Render Display is kind of in limbo, as the images are visible can be viewed and modified in the Render Display, but they can't be accessed outside of the display and therefore will need to be saved. Using the 'Save Image' button directly above the browser allows users to define a format and location for the image. Please reference the 'Saving Images' page of the documentation for more information concerning images and formats.
Additionally, images can be loaded into the browser area, which is very helpful for when users wish to apply image adjustments, or use previous renders to compare a current render from when the render buffer no longer exists. To load an image, LMB+click the 'Load Image' button above the browser area, opening an OS specific window. There, users may navigate to the stored image location, select the target file, and press 'Open' to load the file into the browser. If any modifications are applied to the file, it must be saved again to retain the settings.
General View Shortcuts
The Render Display provides standard MODO controls to adjust size and minimize frames, all the while automatically adjusting the interface, giving users control over what can be seen. Dragging the splitters between the panels will scale the contents of each. There are also some additional controls that provides users an easy way to quickly makes certain panels within the display visible.
'Spacebar' - minimizes everything except the image pane.
'T' - toggles thumbnail panel visibility.
'S'/'C' - toggles right-hand panel tabs ('Statistics'/'Compare' respectively).