
Hair Guides
Home >> Painting and Sculpting >> Hair Guides
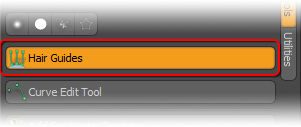
Much like the sculpt and painting tools, MODO offers a variety of tools meant specifically for styling Hair and its associated guides. Located in the 'Paint' tab of the default workspace, the 'Hair Tools' tab (along the edge of the toolbox) give you everything you need for combing and sculpting your fur into the proper 'do'. Many longer hair styles will require the use of guides to properly control the shape of the rendered hair. Generating these guides is simple when using the 'Hair Guides' tool.
Hair guides can be used to control any fur layer added to a material, granted the texture layer is enabled to do so. When using the 'Hair Guides' tool, the generated curves inherit the material tag from the selected surface, so it is best to name your fur surface with a proper material before activating it. If your polygons aren't already selected, highlight the polygons you want your fur to grow from and keep them highlighted. With the tool, activated, you get this properties panel allowing you to click in your 3D viewport to actually generate the fur guides. Clicking and hauling left of right will grow or shrink the guides in length. You can also manually set the length directly in the tool properties.
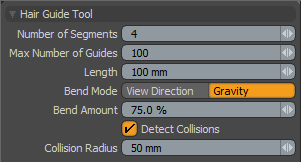 Hair Guide Tool--
Number of Segments: This setting is independent of the fur segments, specifying the number of segments used to create the guides themselves. Increasing the number of guides can allow for more detailed control, but watch out as manipulating them with too many segments can become cumbersome and may produce less than satisfactory results. Add just as many as you need.
Max Number of Guides: Generally, with this tool, a guide is created at each vertex position on the surface. If your surface has a lot of polygons, you may wish to control the number of guides it creates using the 'Max Number of Guides'. If your selection has less than the max number of vertex points, only that many guides will be created.
Length: You can use this setting to manually set the guide length to a specific value.
Bend Mode: With 'Bend Mode' you can choose how the generated guides will bend based on 'View Direction' or 'Gravity'. With 'View Direction', the guides will grow straight from the normal direction of the polygon, but bend based on the rotation of the currently active viewport. This is cool because you can select a few polygons from your fur surface and create the guides with the view rotated one direction. Then select some other polygons and create the guides with a different rotation, getting you half way there with the styling. 'Gravity' will bend the guides toward the negative 'Y' direction.
Bend Amount: The 'Bend Amount' controls the how far a guide will bend when it is created. A setting of 0% would grow guides perfectly straight in the direction of the vertex normal at its root, increasing this value will increase the intensity of the bend.
Detect Collisions: When creating the guides, you might find some are intersecting with surrounding surfaces. Enabling 'Detect Collisions' will avoid this situation by detecting surrounding surfaces realistically drooping and bending the guides around them. Best example is generating guides for long hair, you don't want the hair to intersect the shoulders, so enable this setting to drape the guides over the shoulder for a more realistic look
Collision Radius: You still might find that fur generated from guides intersects with a surface. When 'Detect Collisions' is enabled, the collision radius allows the user to offset the guides from the surface by the specified amount to avoid the intersection. Quite often guides will be used in 'Range' mode, generating fur fibers within a certain range around the guide. It may be helpful to set the collision radius to half the range (as range is a diameter) to effectively avoid fibers intersecting the surfaces as well.